
End User Manual Document Control
Link to the product page for Document Control Software SharePoint.
Shareflex Quality Documents SharePoint is a pre-configured, ready-to-use Microsoft 365 SharePoint Online Quality Document Management system. It facilitates the storage, access, management, and control of quality documents and other digital content throughout their entire lifecycle, from new document creation to document revision and ultimately archiving.
The quality document management system optimizes your document management processes, including version control, search capabilities, and access control. Additionally, it includes collaboration features such as online editing and commenting, enabling users to effortlessly track and share documents. The solution is based on Microsoft technology, is highly scalable, and provides an optimal foundation for secure access, even from distributed locations, your home office, or mobile devices.
The solution revolves around creating and periodically reviewing controlled documents in accordance with ISO standards. Documents are guided throughout their entire lifecycle. Noteworthy features include configurable workflow management, easy management of role-based user rights, personal task management, and electronic notification confirmation.
This software is also available in Dutch. The software is customizable to your preferences.
In the following sections, we delve into all the features of Shareflex Quality Documents, accompanied by example screenshots to give you a better understanding of the solution.
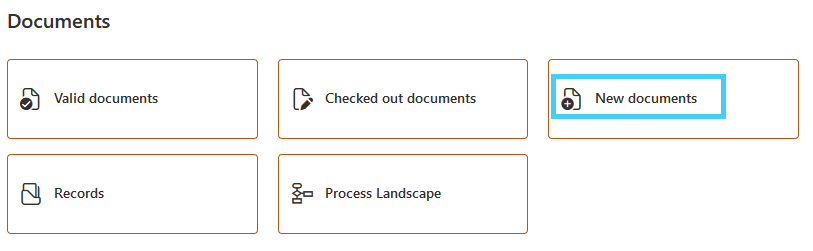
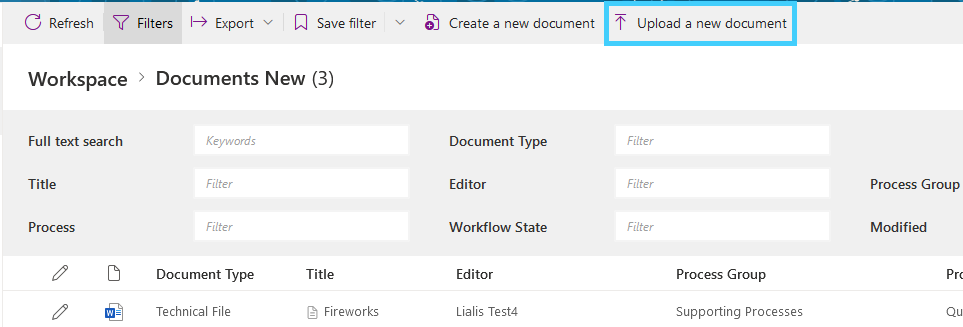
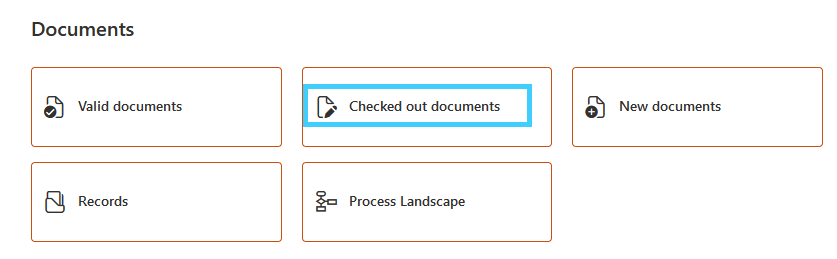
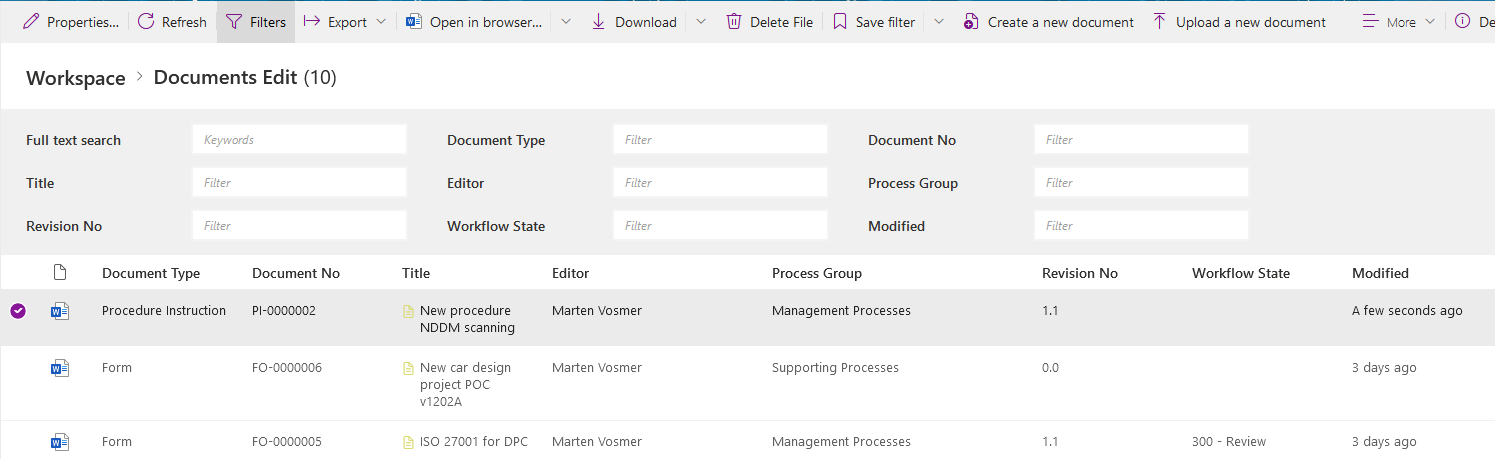
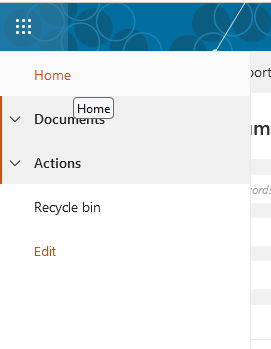
Documents
On the homepage, you’ll find five links to frequently used features of the Shareflex Quality Document Management system.
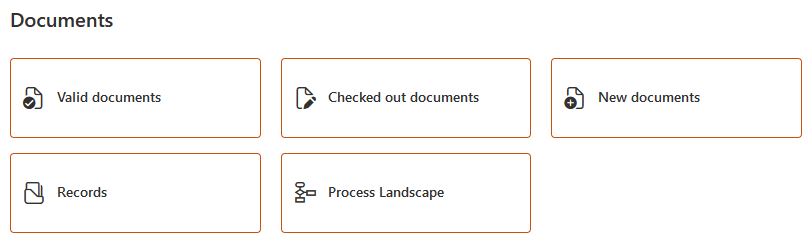
Below, we explain each link/function.
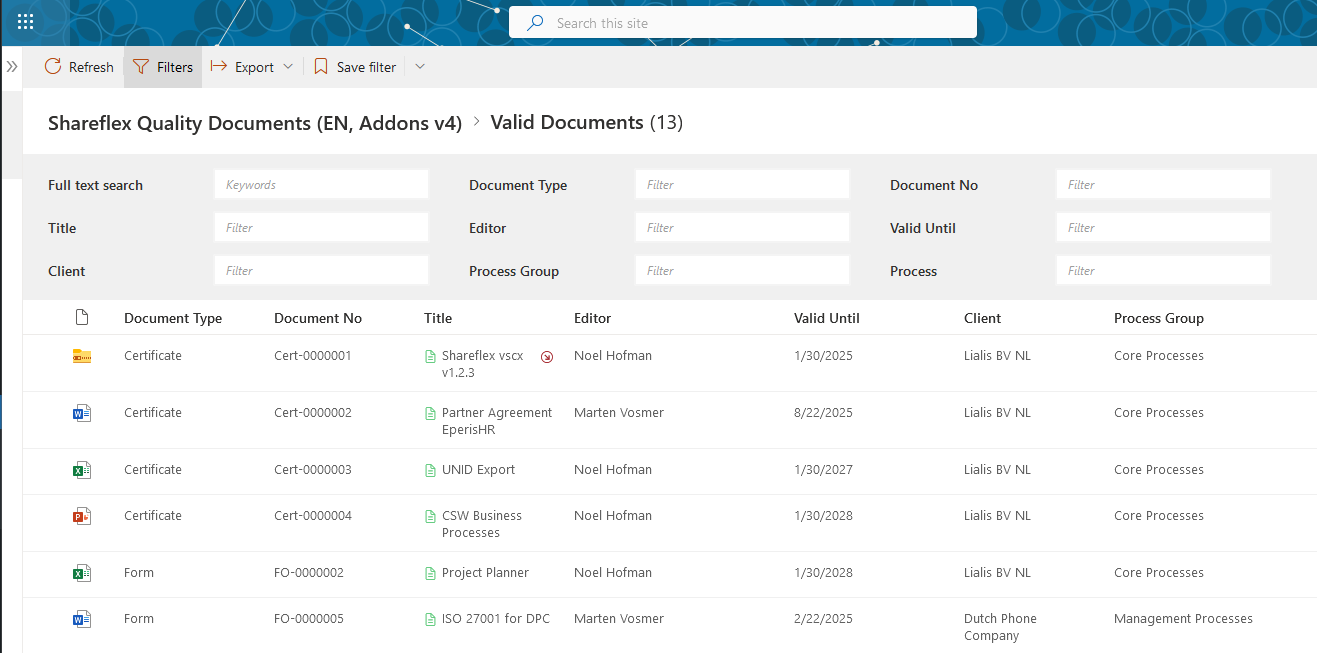
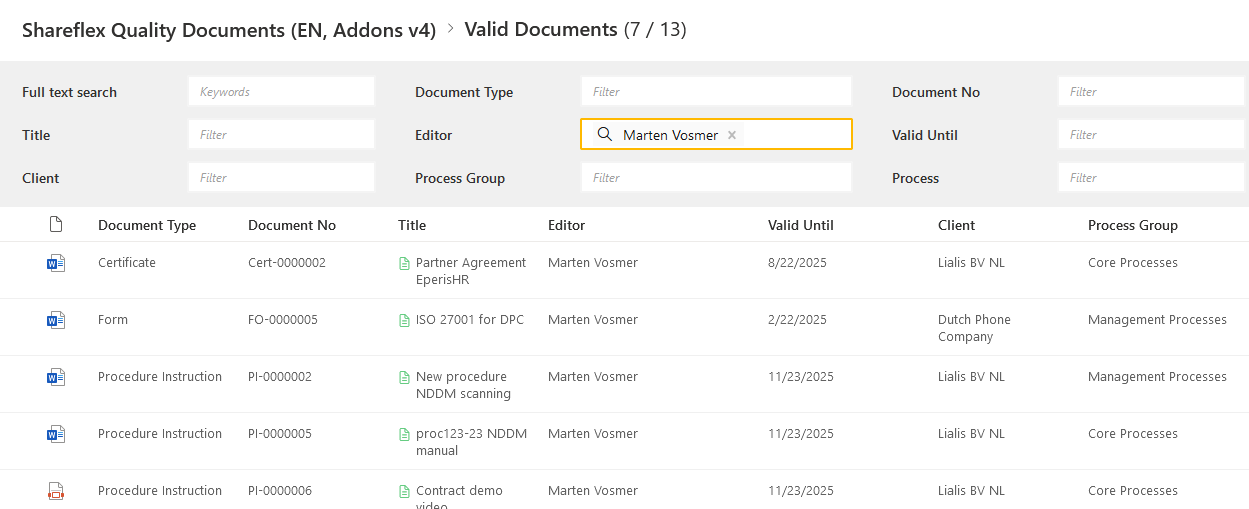
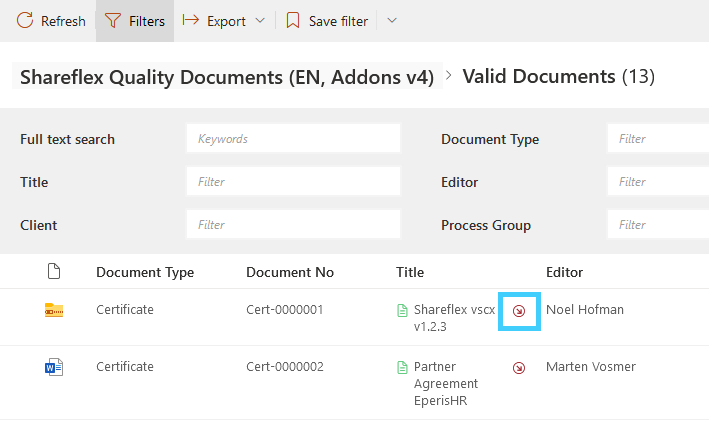
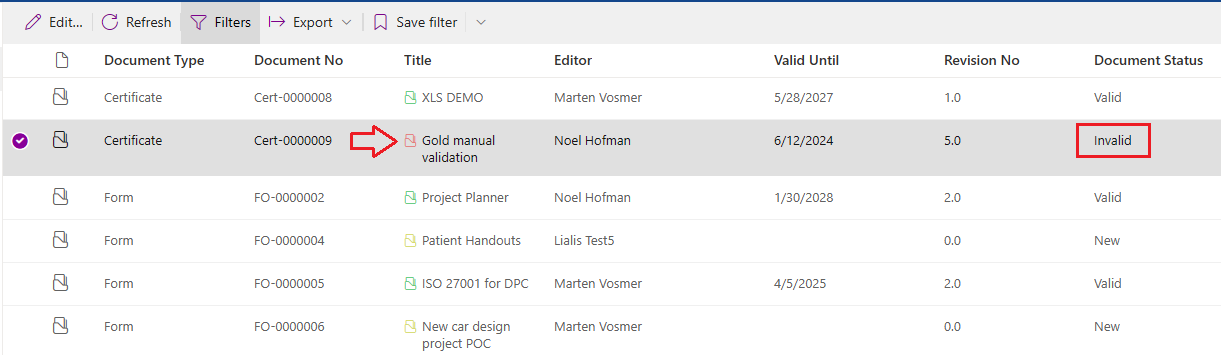
Approved Documents
Provides access to all valid documents that the user is allowed to see (based on configured permissions).
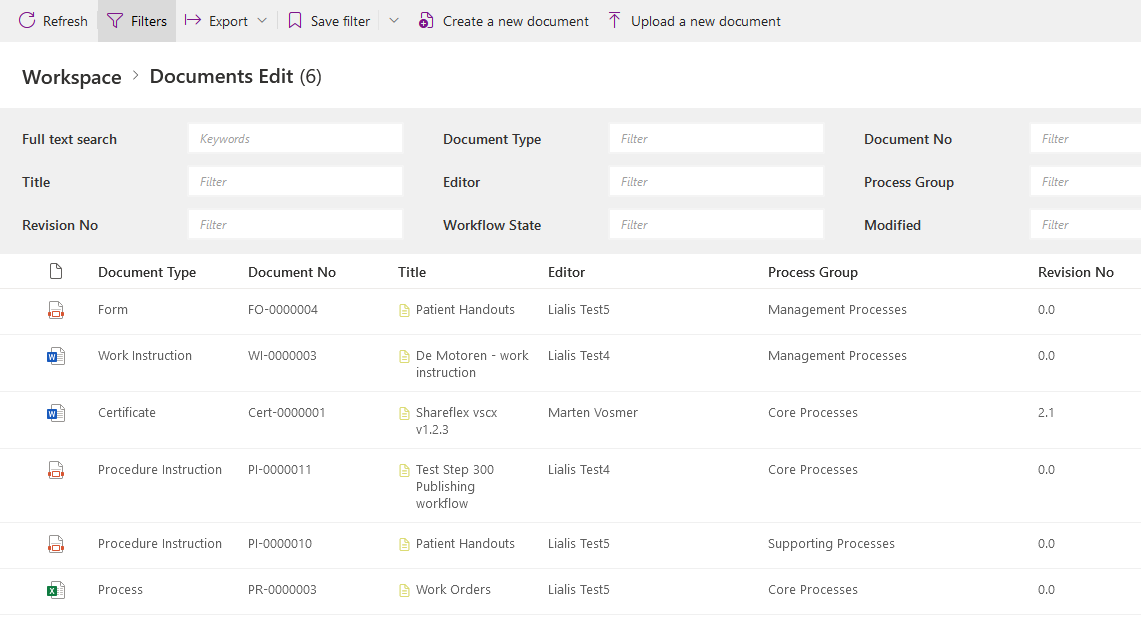
Documents in Progress, Edit checked out documents
This function provides access to all documents currently checked out, indicating that individuals are actively working on them.
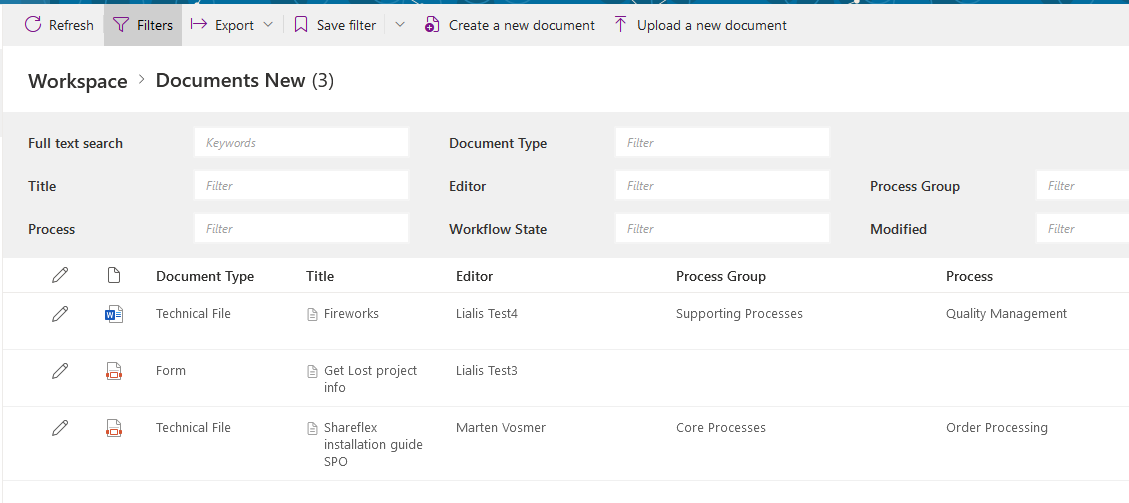
New Documents
Use this function to create new documents (more details explained below).
Records
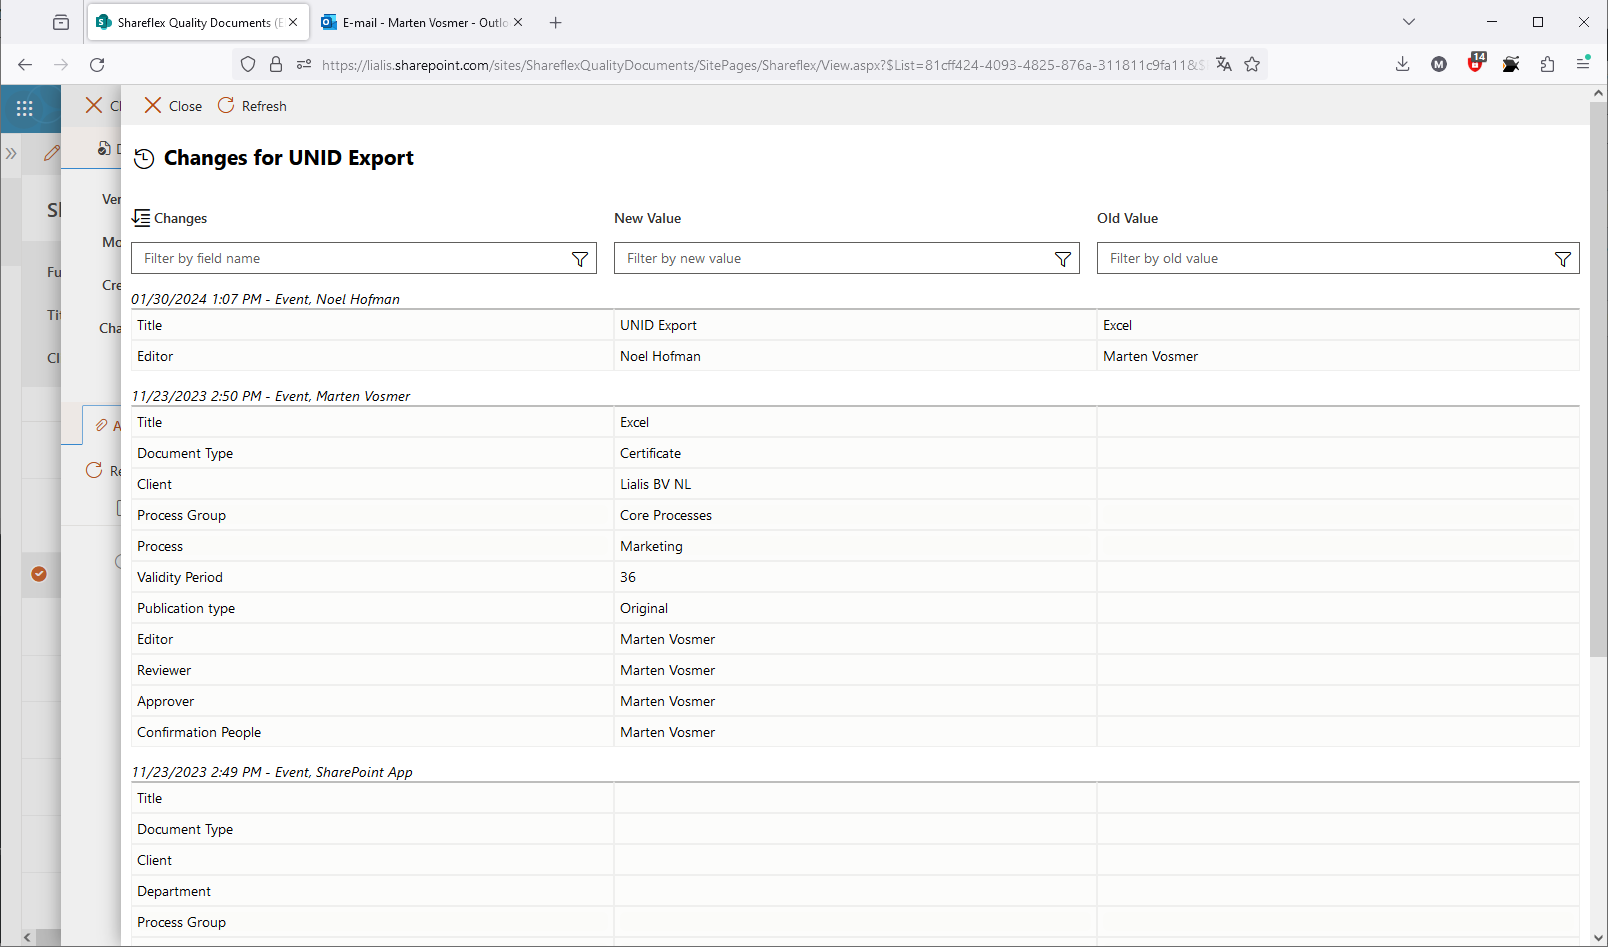
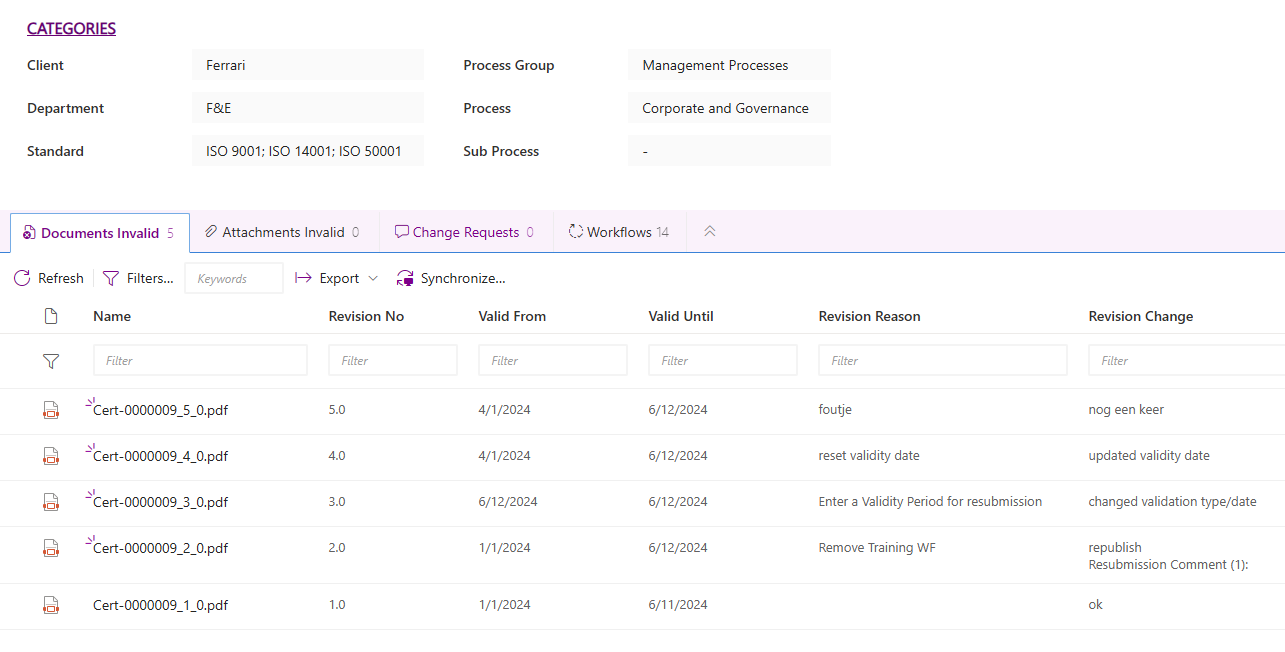
The record component is essential as it provides a complete audit trail report of all changes made to a specific document. All changes to metadata are available, and it is possible to view previous versions of documents (files).
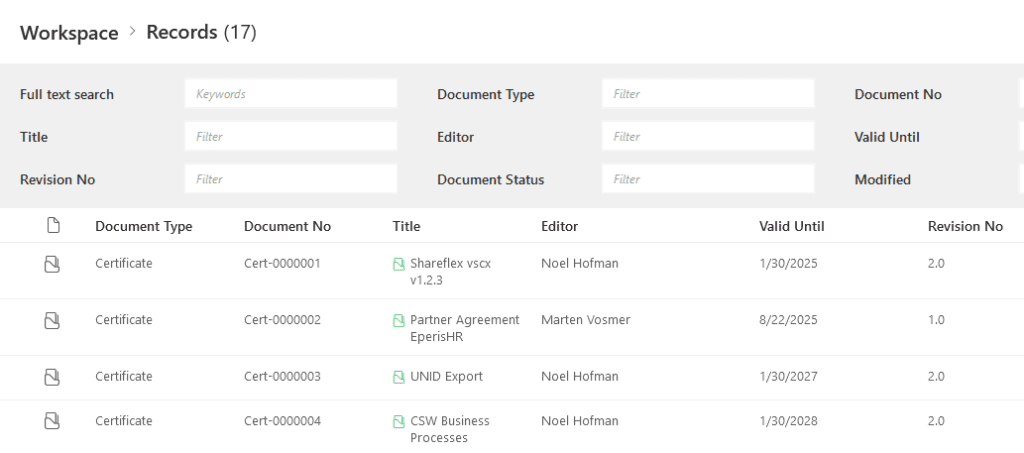
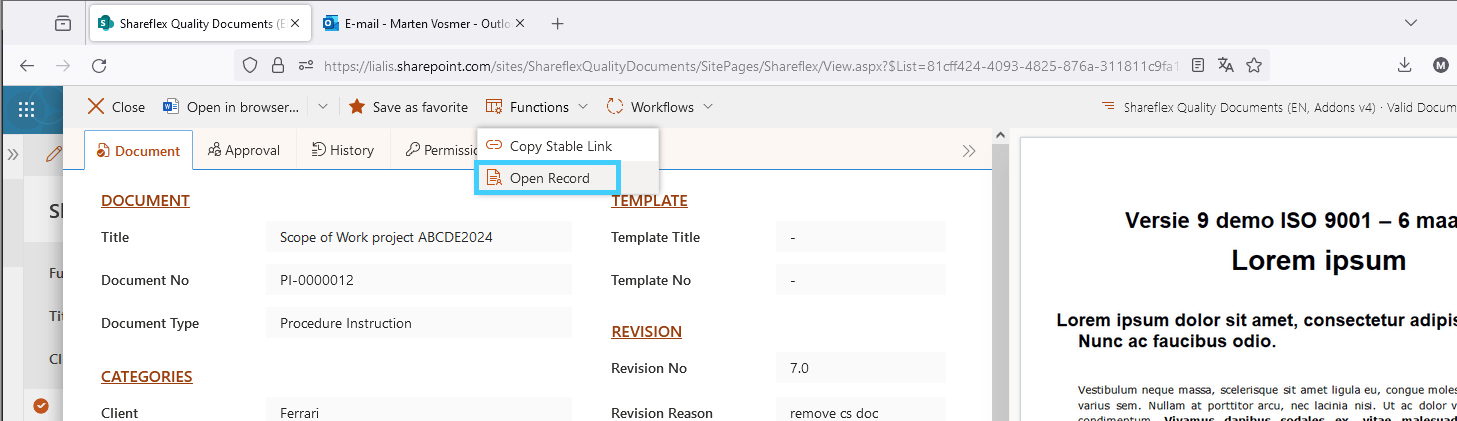
The record is also accessible from an approved document.
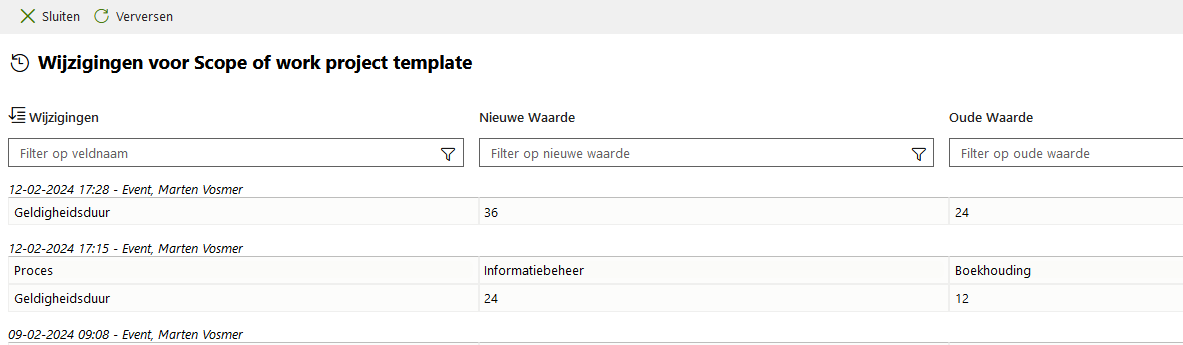
The record view history gives a report audit trail of all changes made to the main document metadata.

The yellow marked metadata fields indicate a change in the value between the 2 versions.

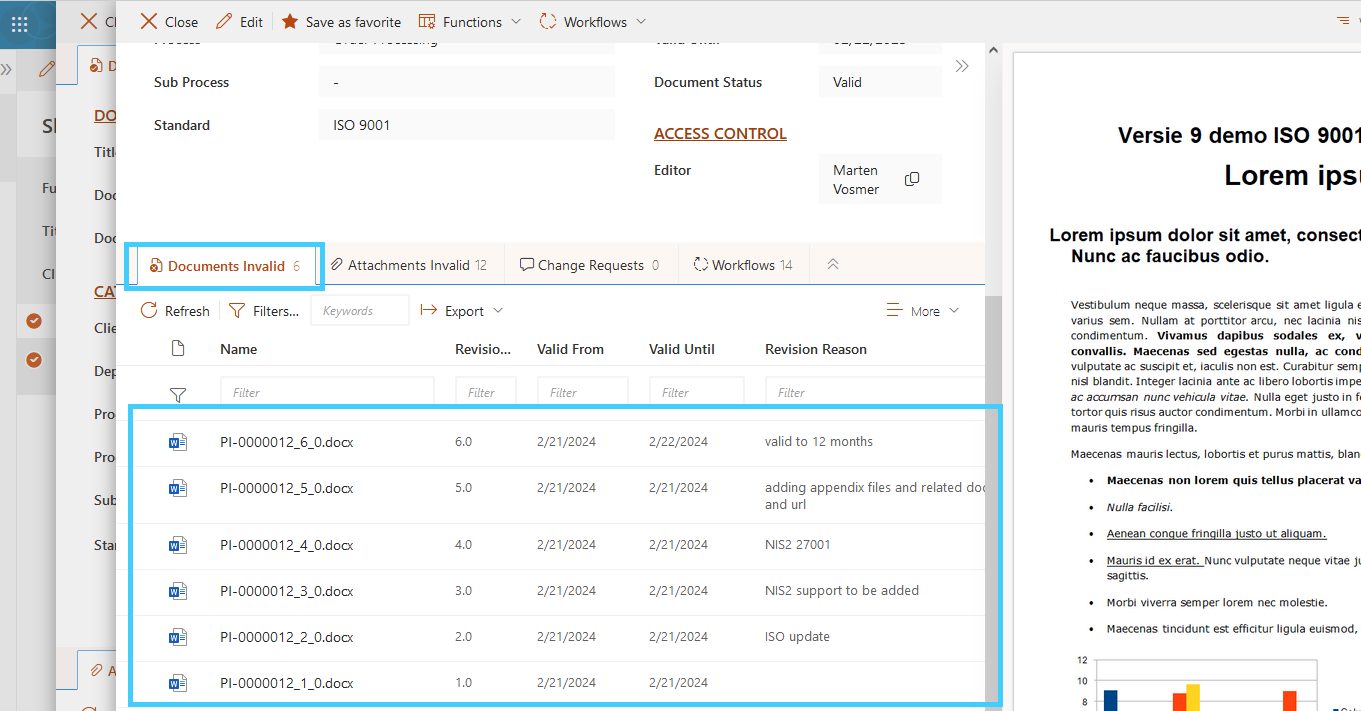
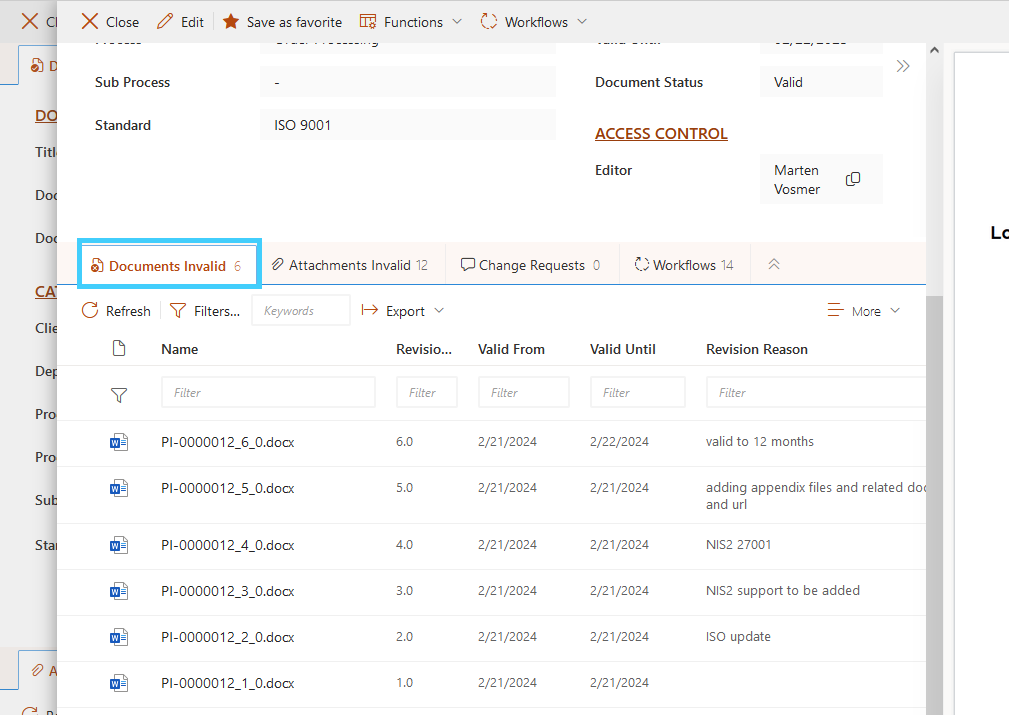
The “documents invalid” section of the record shows the previous version of the document, and the reason for revision is also displayed.
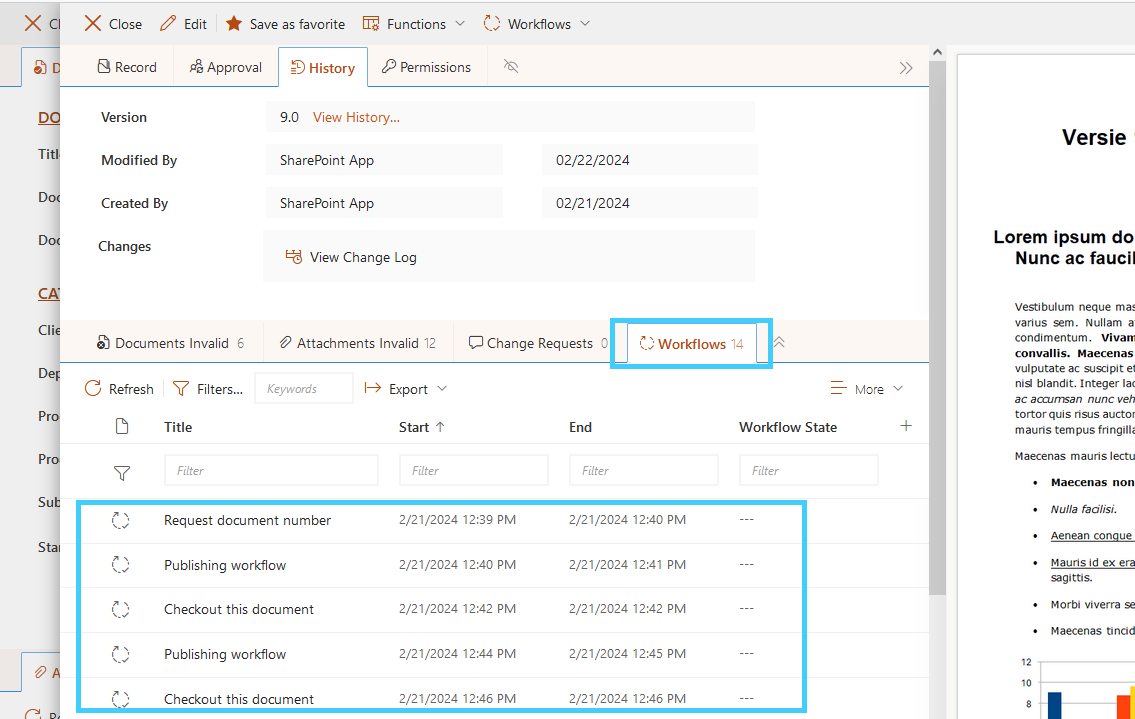
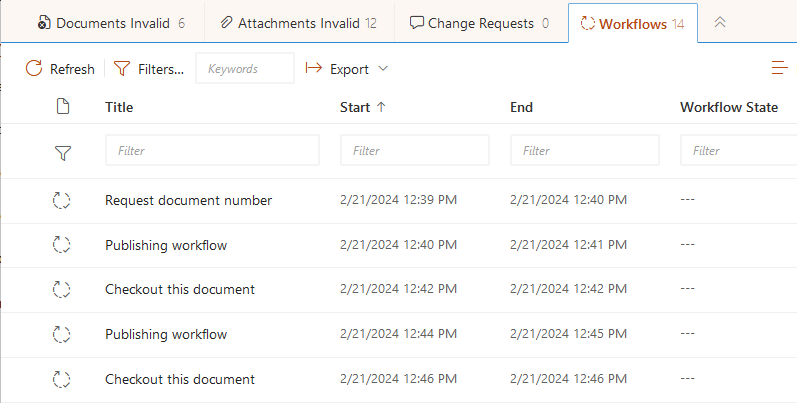
All workflows are displayed in the record, providing detailed insight into the approval process.
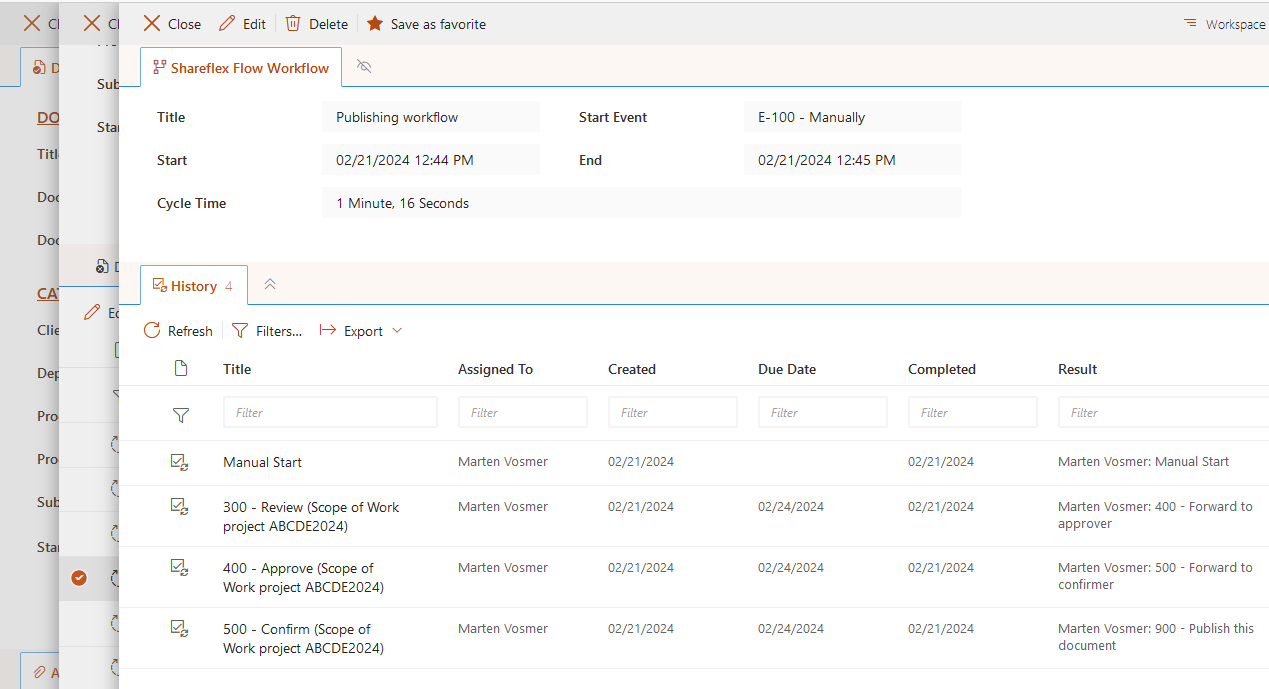
An example of a record audit trail workflow log is displayed below.
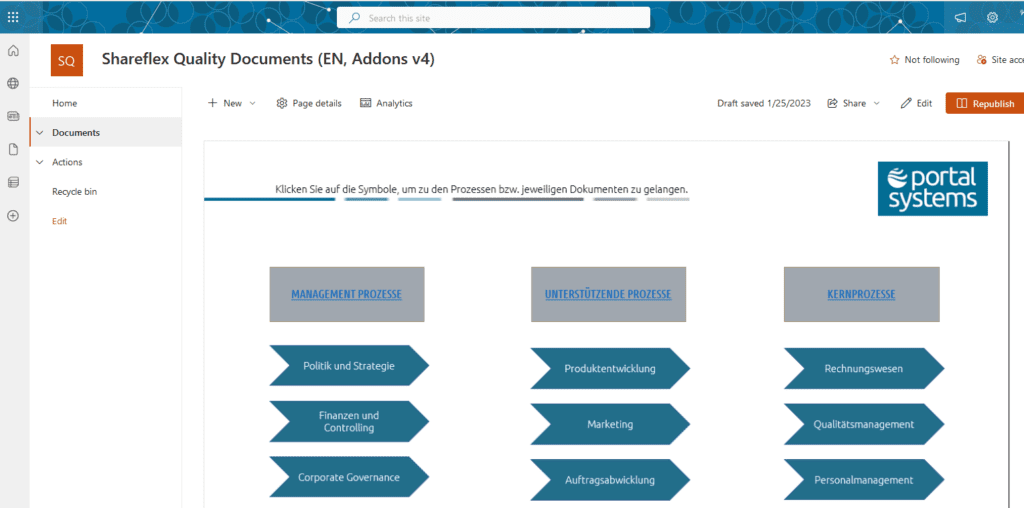
Process Landscape
In this section, the user can place a PowerPoint file to help them find the right data. The client is completely free to design the presentation and underlying links. This section does not contain smart programmed functionality.
Actions
The “Actions” section displays 8 tiles, each briefly discussed below.
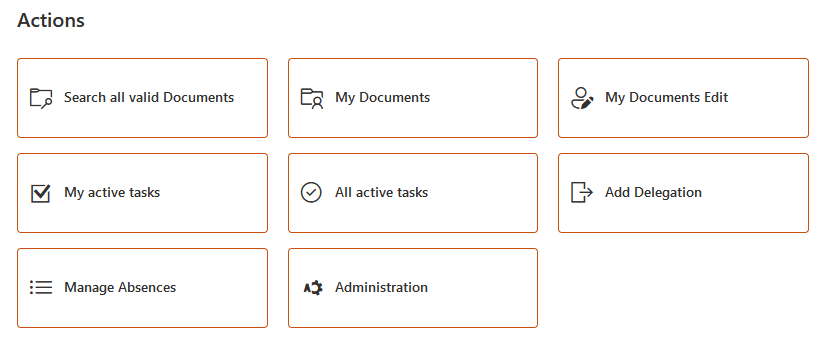
Search in Approved
Access to all approved documents, with handy filters to find them.

My Documents
Documents created or edited by you. It is possible to select another person as an editor.
My Documents in Progress / Edit
This list shows all documents not yet approved for the logged-in person in the system, so documents in progress, new documents, or documents undergoing revision.

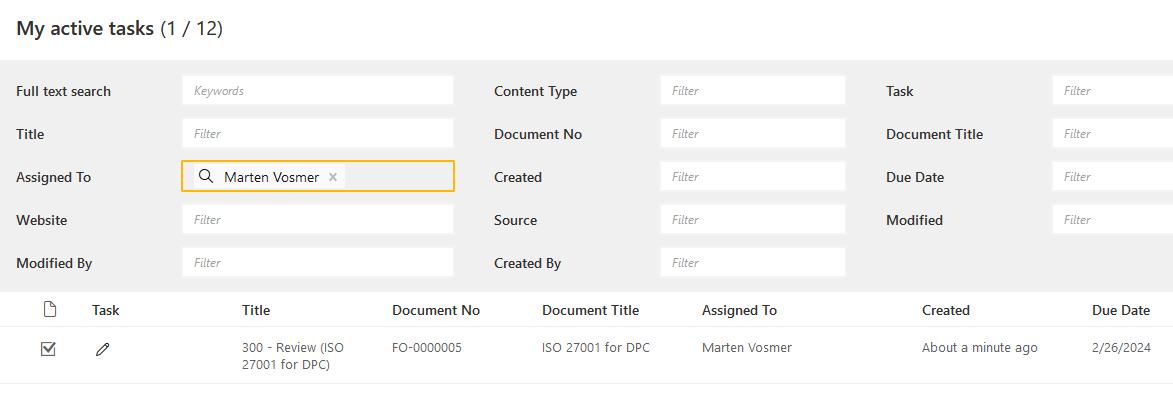
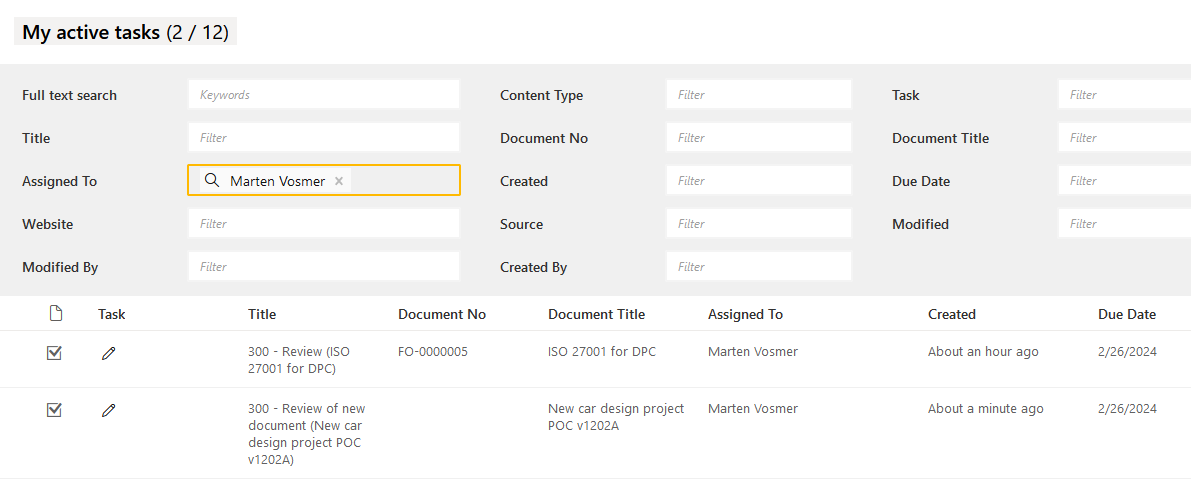
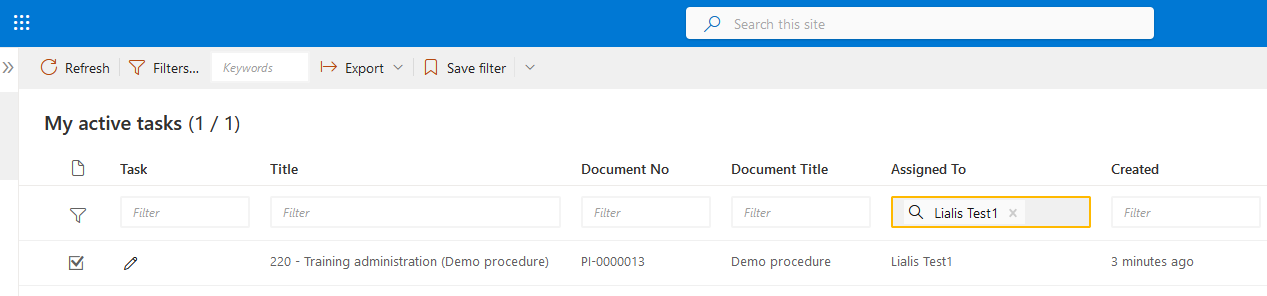
My Open Tasks
This list shows all workflow tasks that the logged-in user still needs to perform.
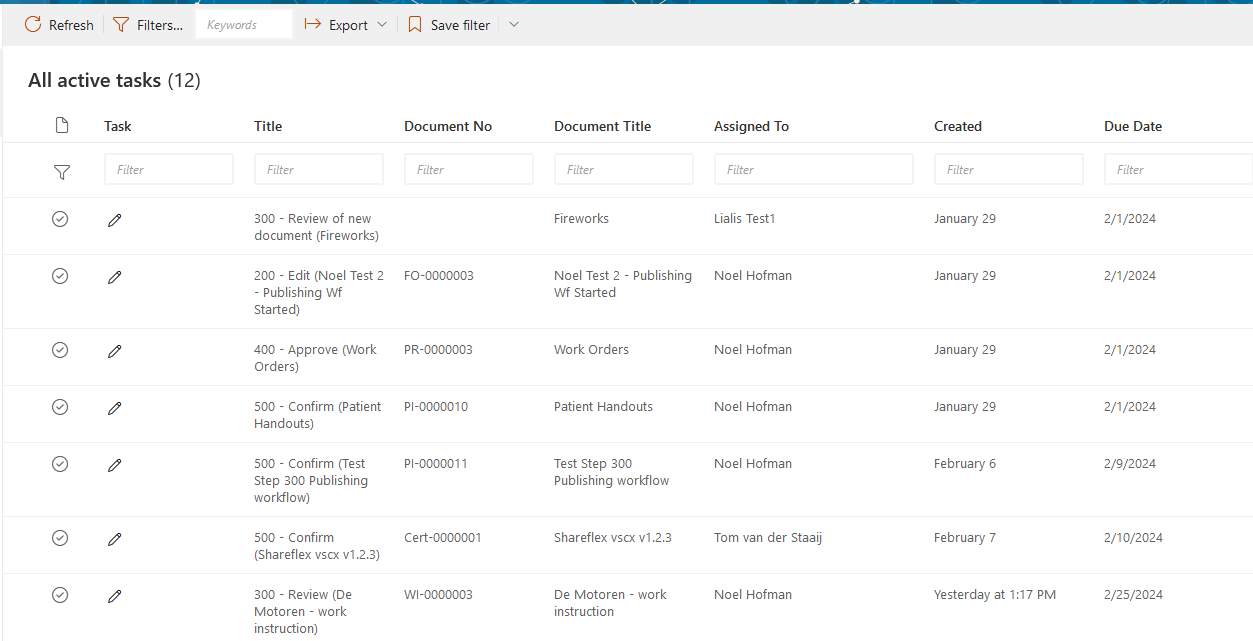
All Open Tasks
Insight into all workflow tasks for your organization.
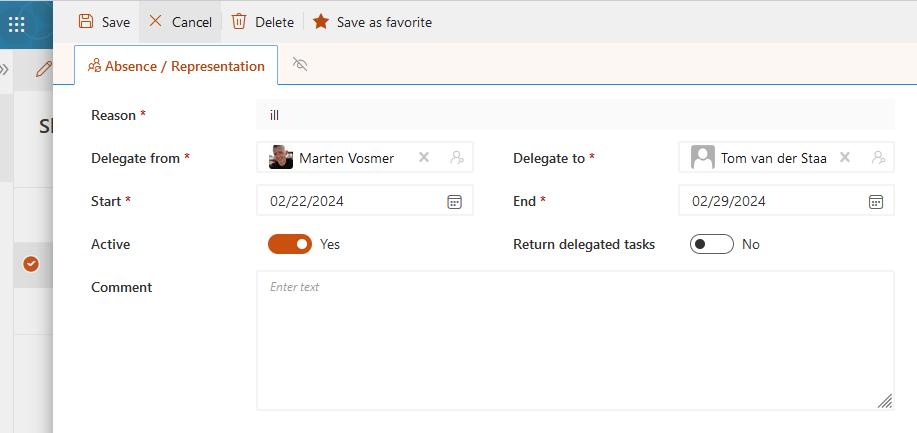
Set Your Substitute
Specify the person who takes over your workflow tasks and rights in the application during your absence.
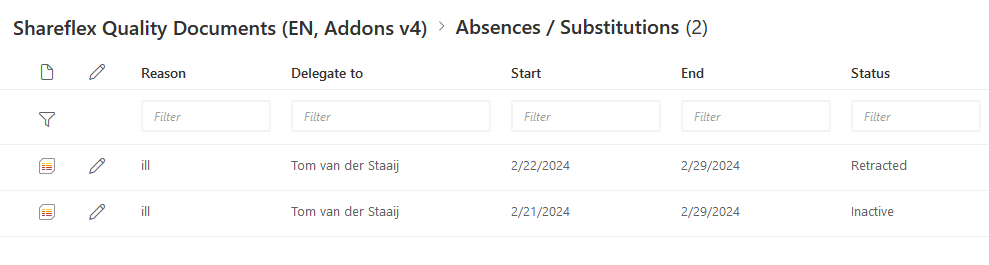
Manage Substitutes
Manage your substitutes, activate or deactivate substitute profiles.
Administration
The administrative part of this software, including workflows, permissions, notifications, document templates, clients, departments, etc., is set up by the application administrators.
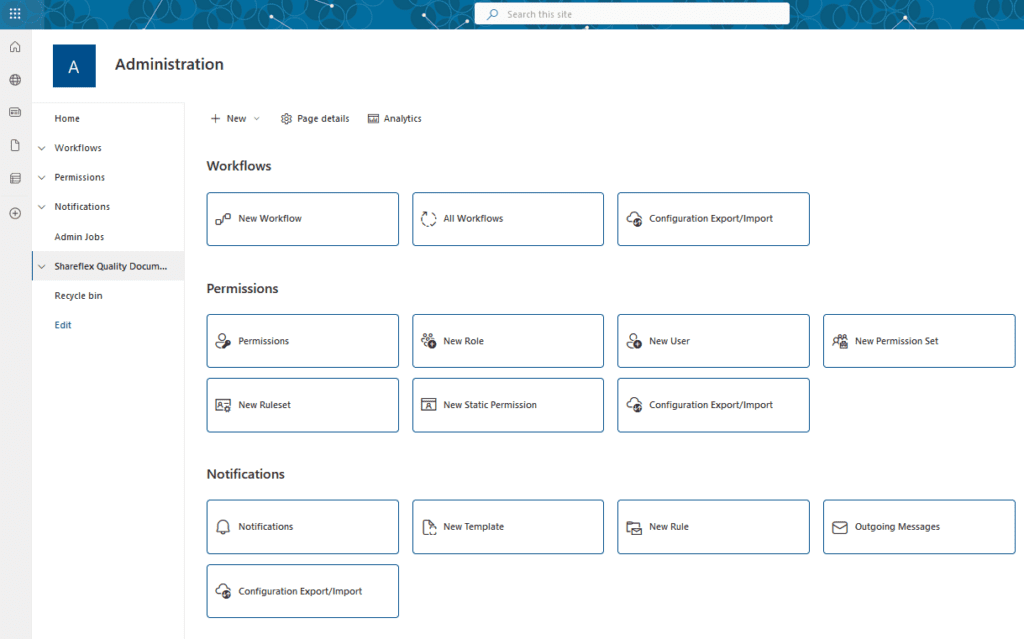

The details are further described later in the document, under the management section.
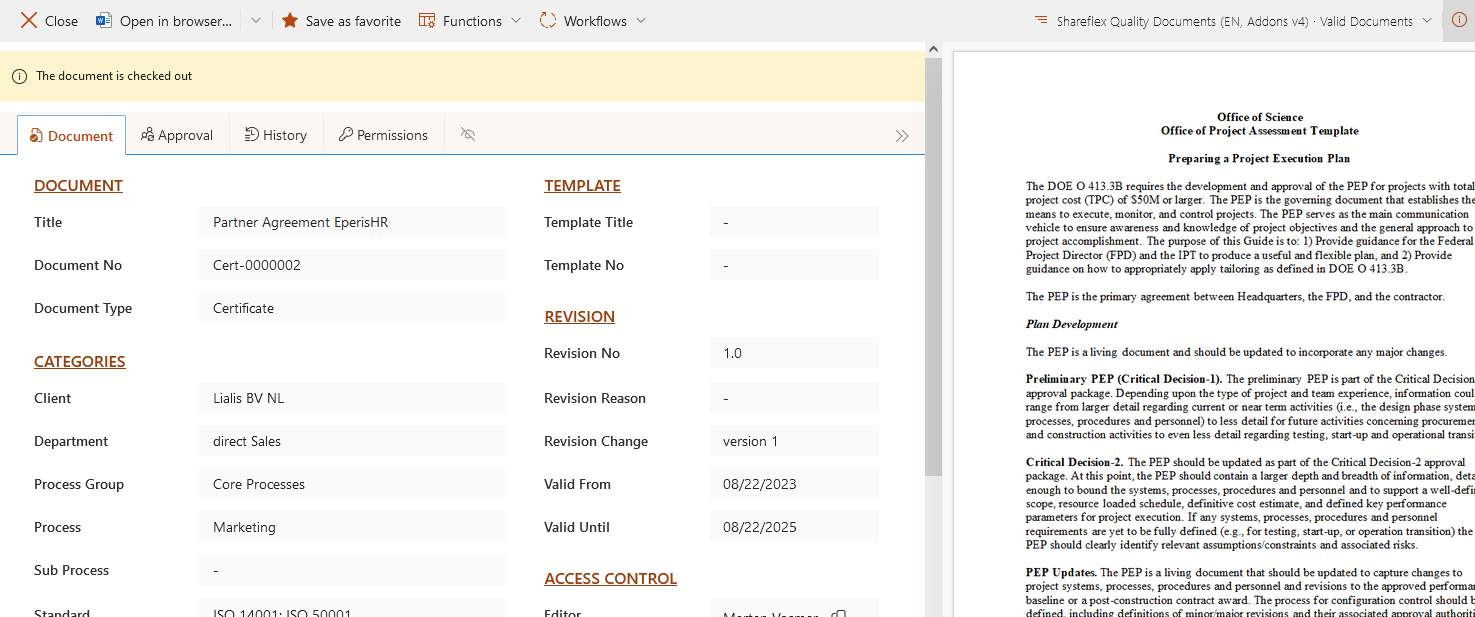
Approved documents cannot be modified, hence the “Edit” button is not available. Go to the “Edit Documents” section to learn how a document can be adjusted.
An example of an approved document is depicted below. Most features of this form are self-explanatory; some important functions are explained below.
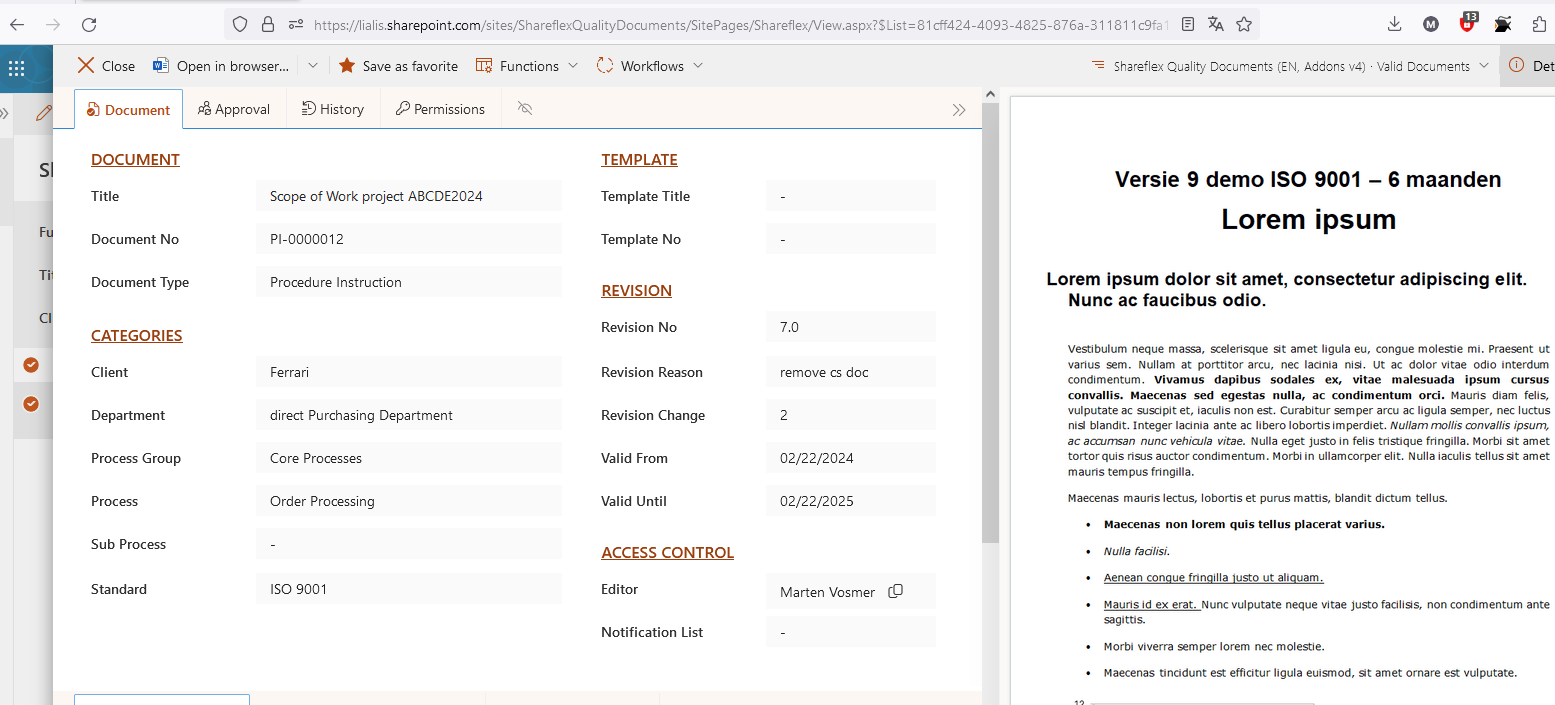
Max One (Word) Document per Set of Master Data
One (Word) document is by definition accompanied by one set of metadata or master data. The document is shown on the right, and the master data is on the left side of the screen. It’s not possible to link two main documents to a master data record. However, it’s possible to add attachments to the main record.
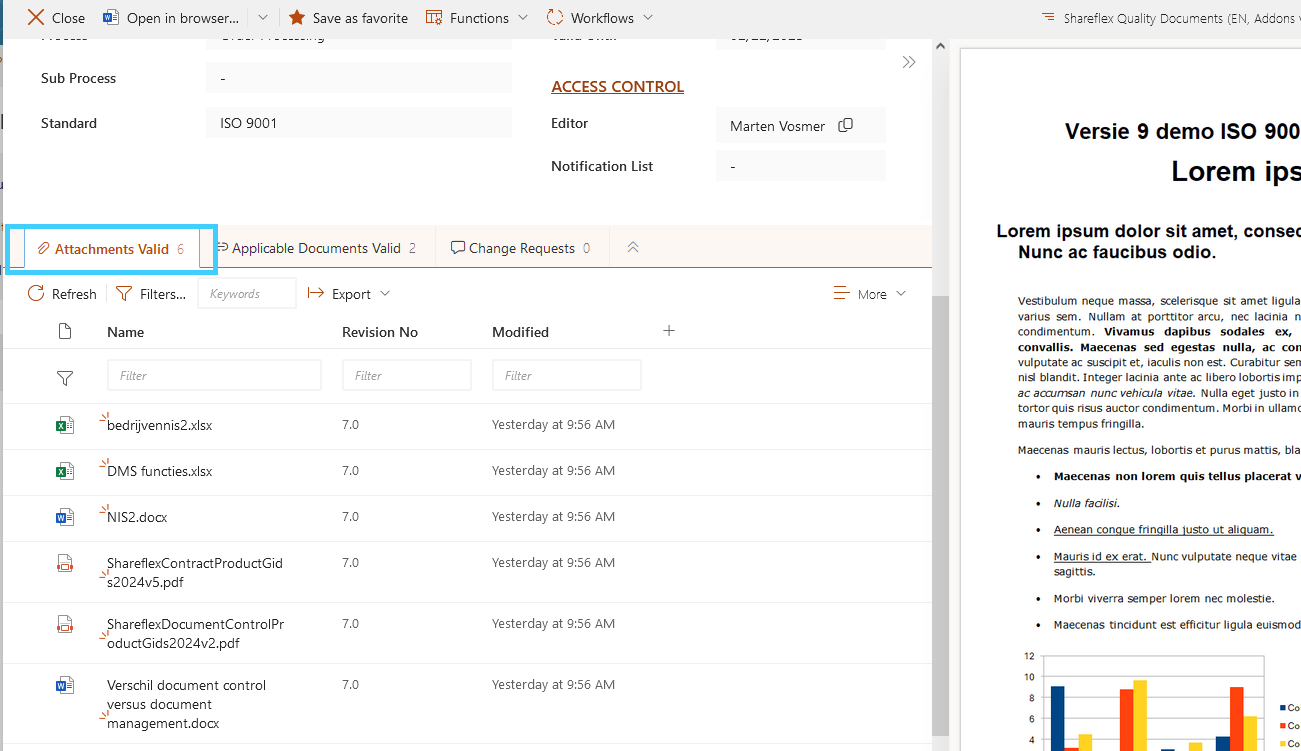
Attachments valid
Additional attachments may have been added to the record. These attachments follow the version change cycle. So if the main document is changed, the attachments also get a new version, even if these attachments are not modified.
Relationships Between Approved Documents
It is possible to establish relationships between documents in the application or with a URL.
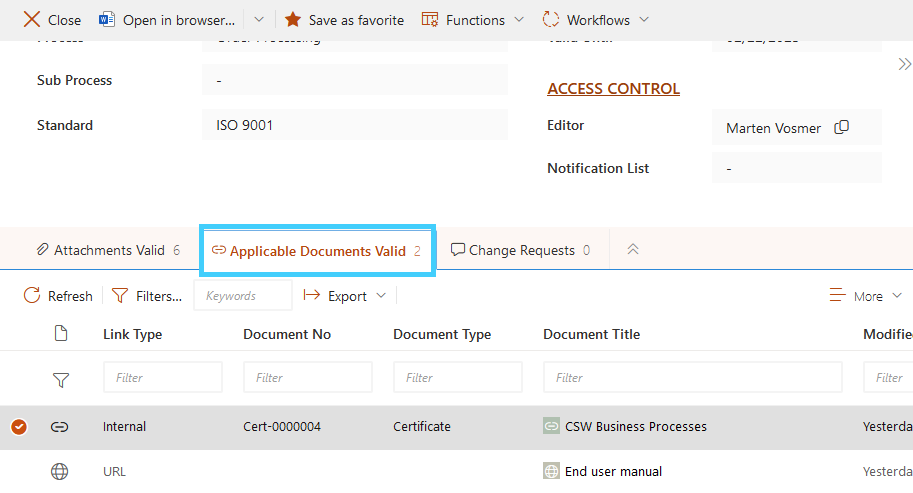
The related documents and URL’s can be opened.
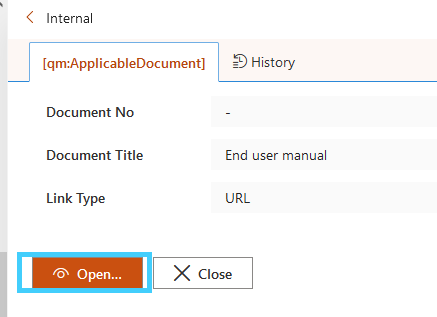
The purpose is to inform the user about other documents or web pages directly related to the content of the main document.
An approved document cannot be modified at all. It is only possible to create a change request for an approved document.
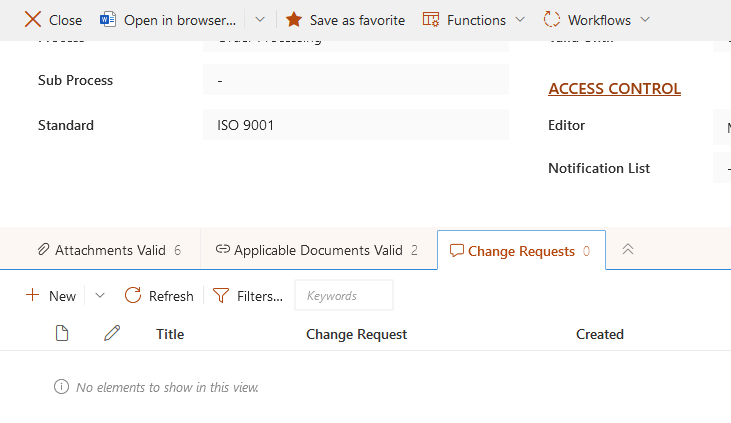
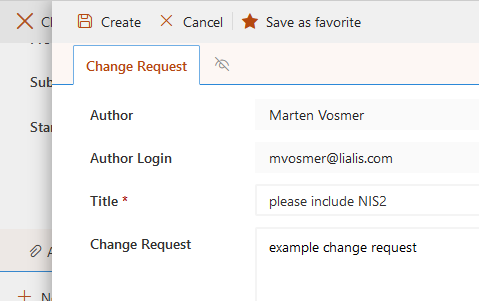
The document manager receives the following update mentioning the new change request:
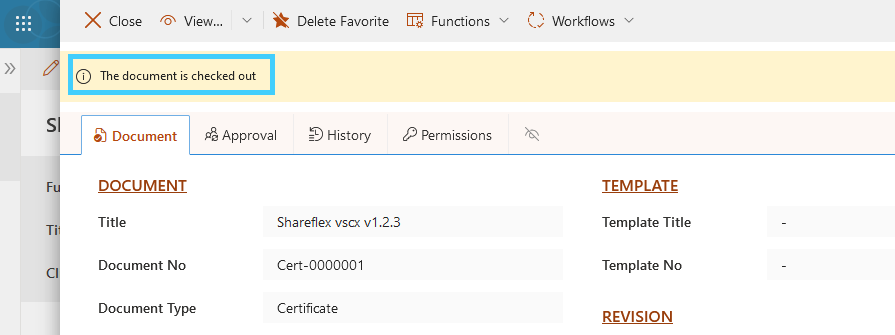
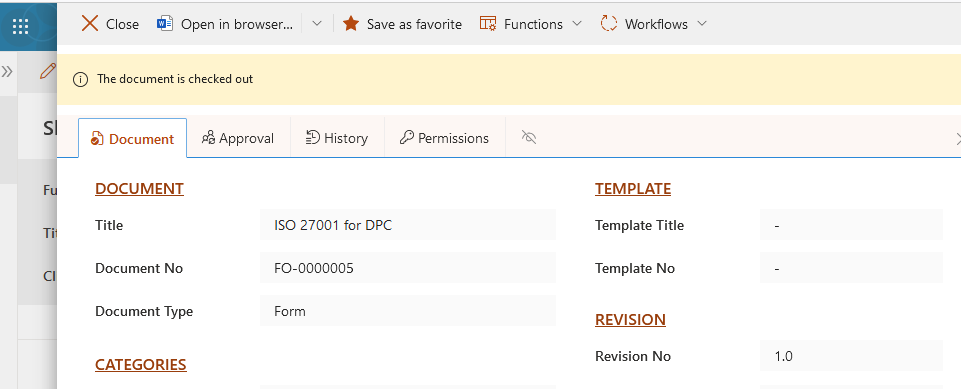
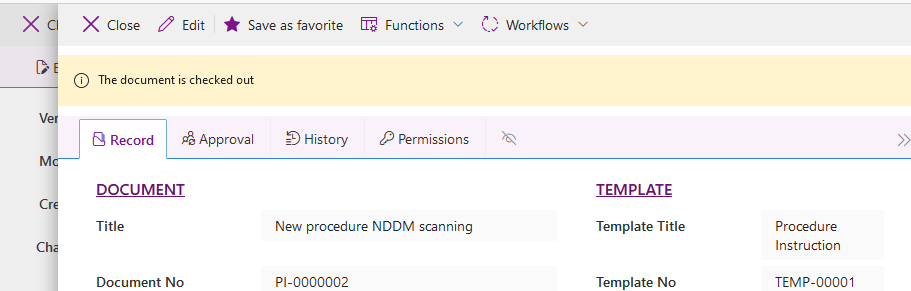
Checked Out Document
If an approved document is in progress, you will see the following message. This means the document is still valid and will be changed soon.
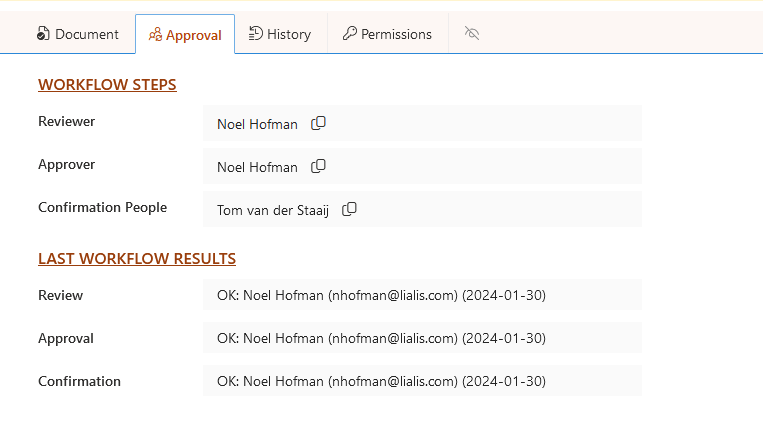
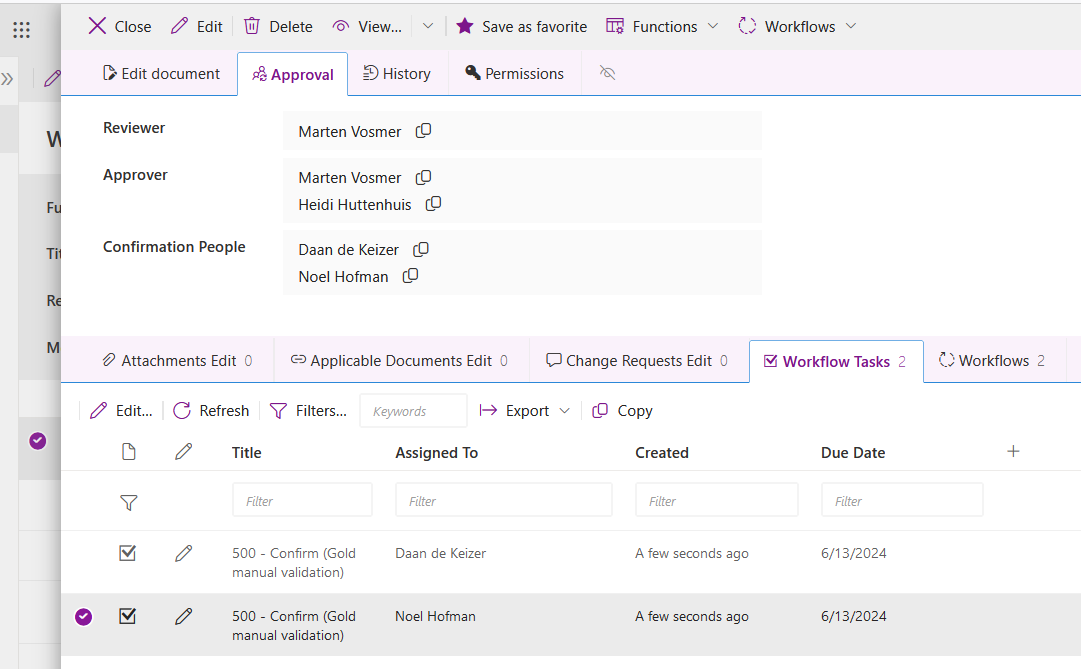
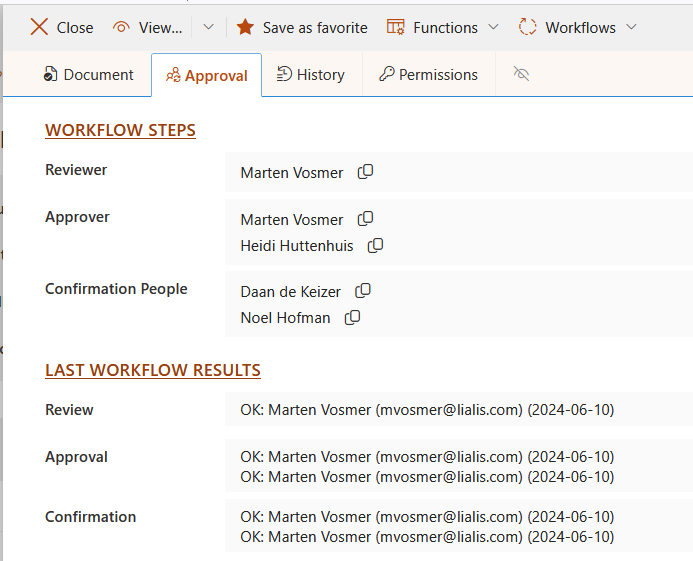
Approval
The “Approval” tab shows the latest workflow operations that led to the approval of the last version.
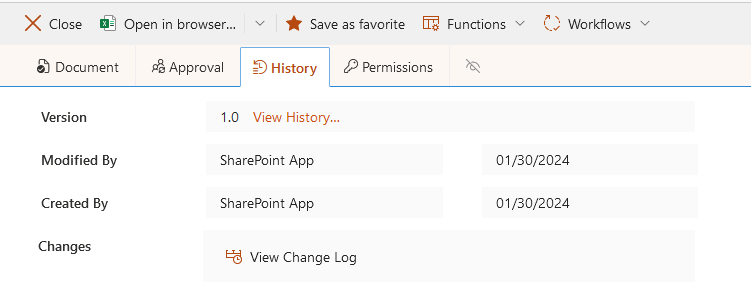
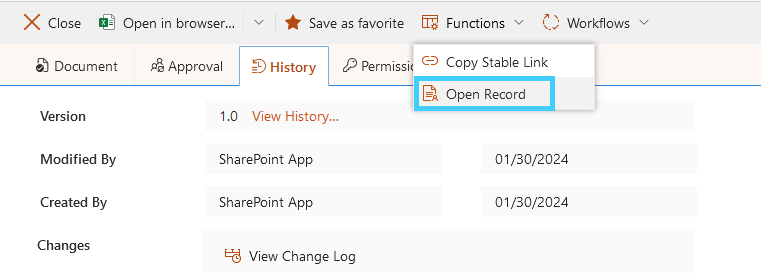
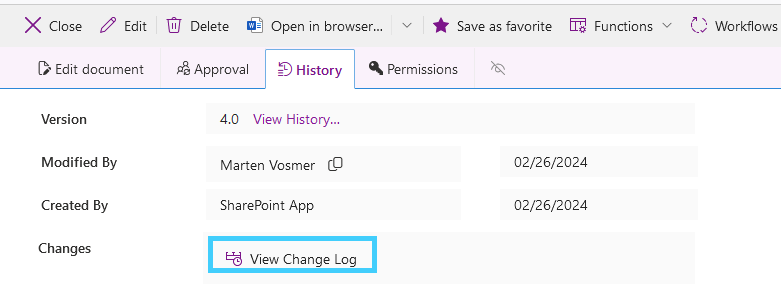
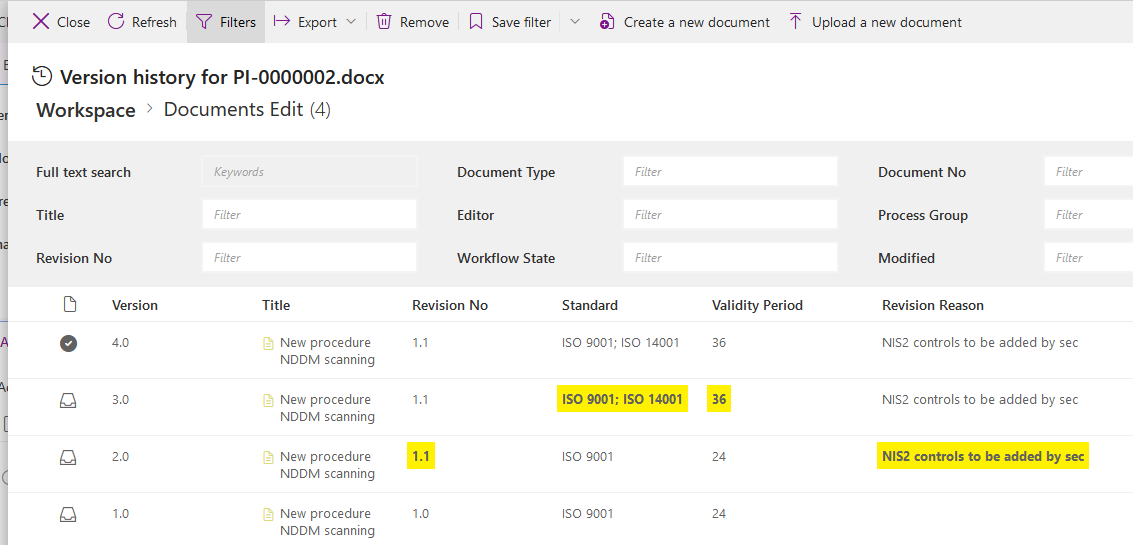
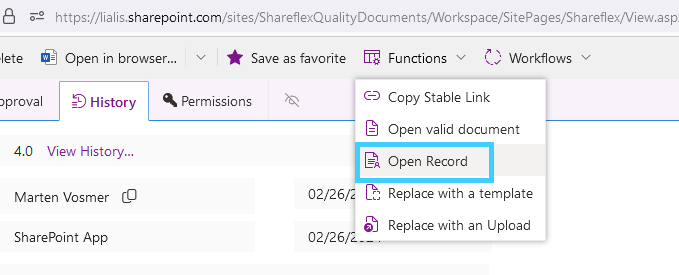
History
The version number of the record is always 1.0; you can ignore this.
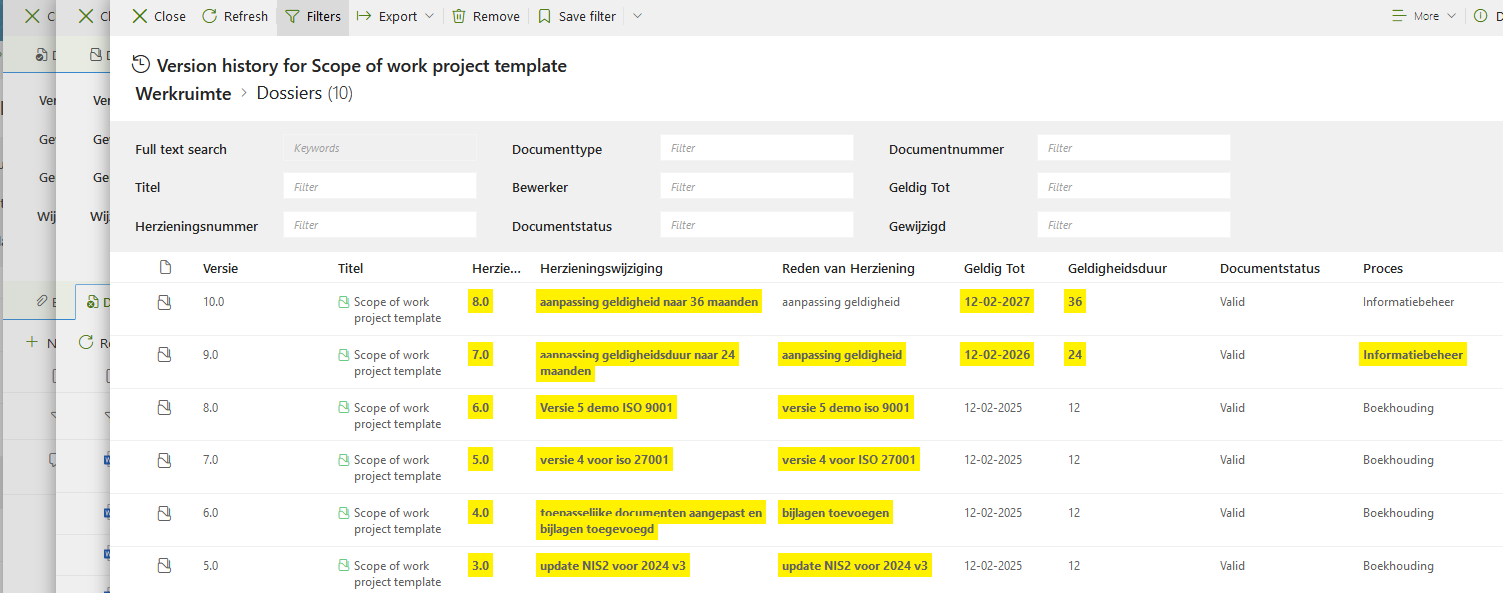
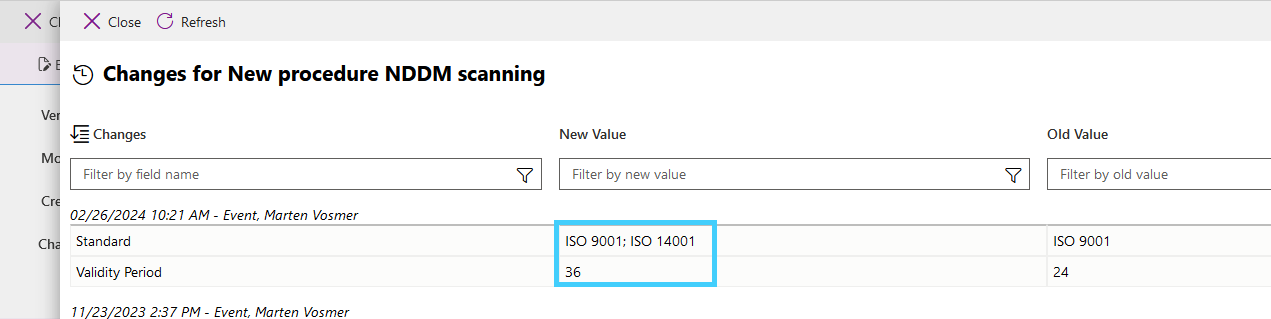
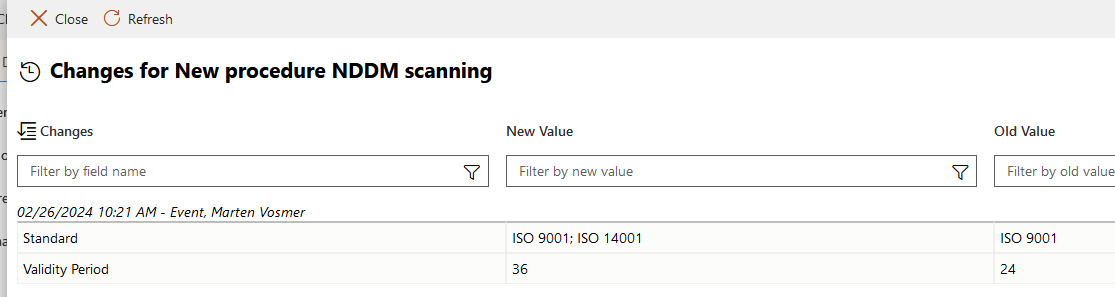
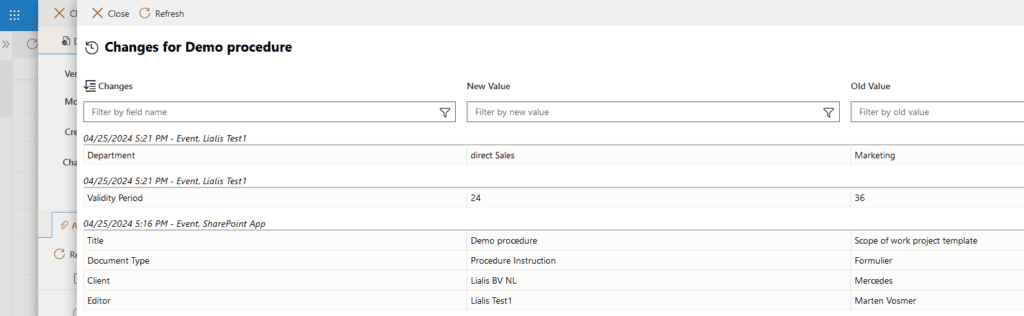
The changelog of the recently modified document only shows changes in the metadata fields. The adjustment of the validity period from 24 to 36 months is now displayed.
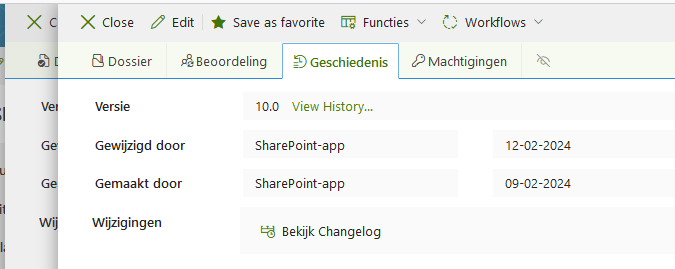
Record for audit trail purposes
This section is essential because the file provides a complete report of all changes made to a specific document. All changes to the metadata are available, and it is possible to view previous versions of the documents (files). The file is also accessible from an approved document.
The file does have a version number (where the main document is always version 1.0). In this example, the file has been modified 10 times because the associated main document has also been modified 10 times.
The “View History” button details exactly what has changed in the metadata.
The “View Change Log” button displays the same but in more detail with the old value and the new value of the change.
The “Invalid Documents” section of the file shows the previous version of the document, and the reason for revision is also displayed.
All workflows are shown in the file, providing detailed insight into the approval process.
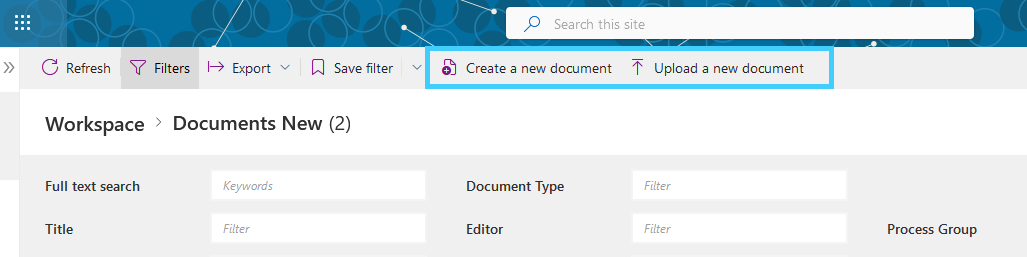
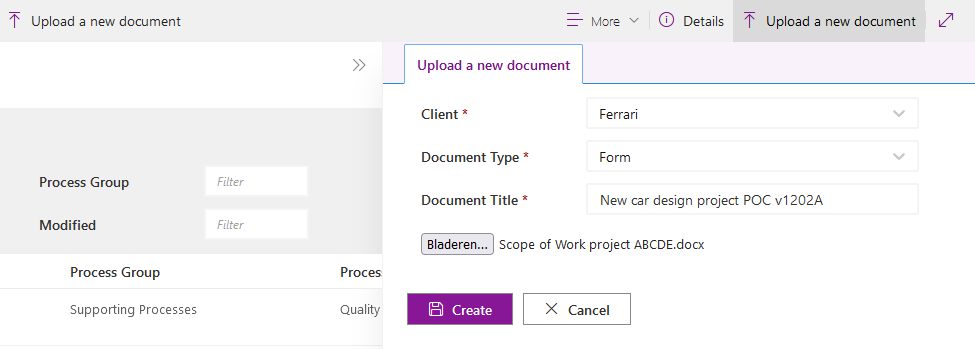
To create new documents, go to the “New Documents” tile.
There are 2 options: creating a new document (using a template) and uploading a new document.
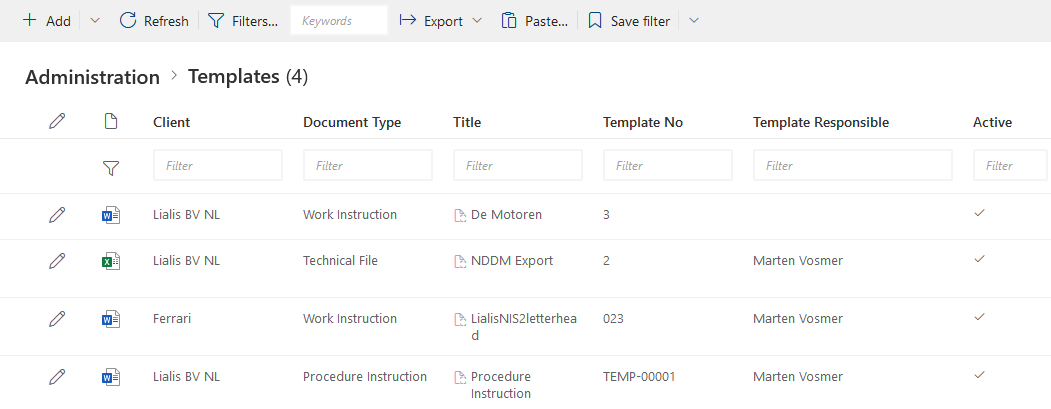
Creating a New Document (Using a Template)
The template templates must be created under ‘Administration’.
Choose to create a new document.
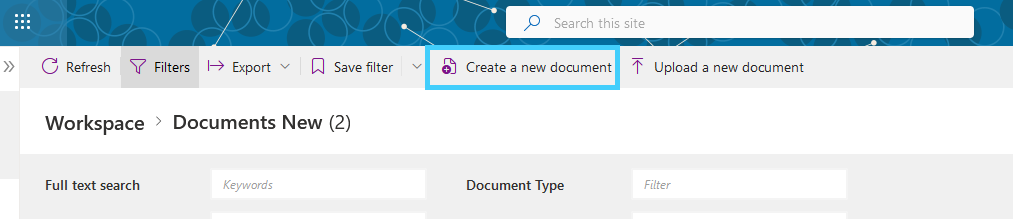
If the correct customer and document type are selected, the template for creating a new invoice will appear.
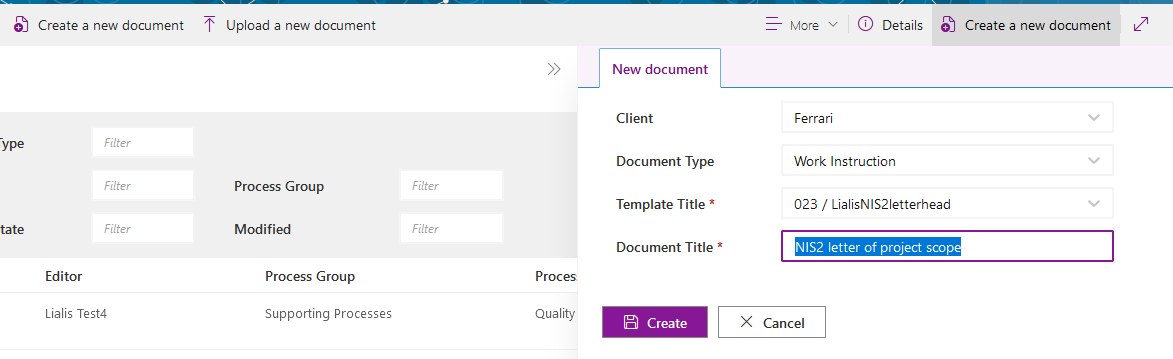
The new document appears in the list of new documents and can be edited.
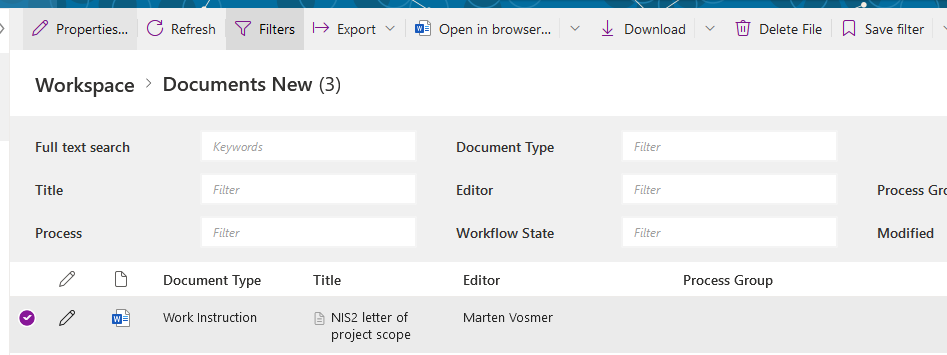
Now you can continue working on this new record to prepare it for the document number and approval workflow.
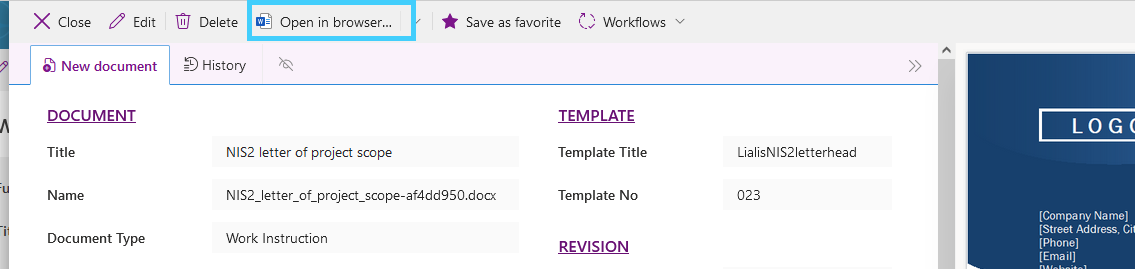
Metadata needs to be entered in various places.

Before modifying the Word document, it’s wise to save the metadata record.
The Word document can be modified using this link.
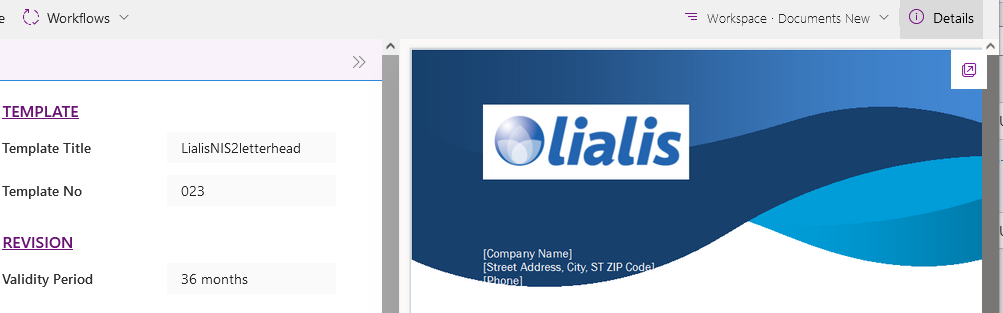
In this example we add the logo to this word document.

A handy tip to show updates to the Word document from the main record is to press this button twice; then the right window part will be refreshed.
The document is now ready for the approval workflow process, which is described under the heading ‘Workflow New Documents’. Now, let’s first describe the second option, namely creating a new record by uploading a file.
Uploading a New Document
Choose to upload a new document.
The new document appears in the list of new documents and can be edited.
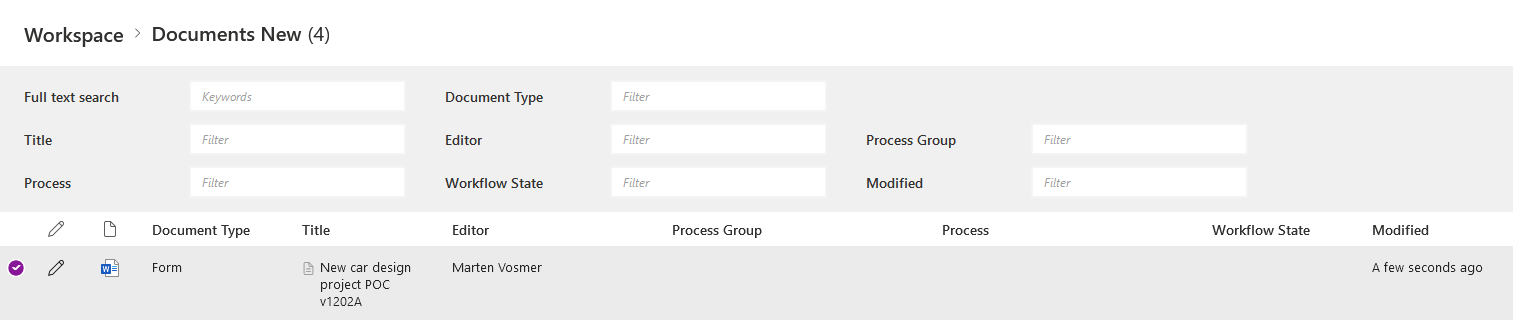
For editing, the same methodology applies as in the template example described earlier in this section.
Workflow New Documents
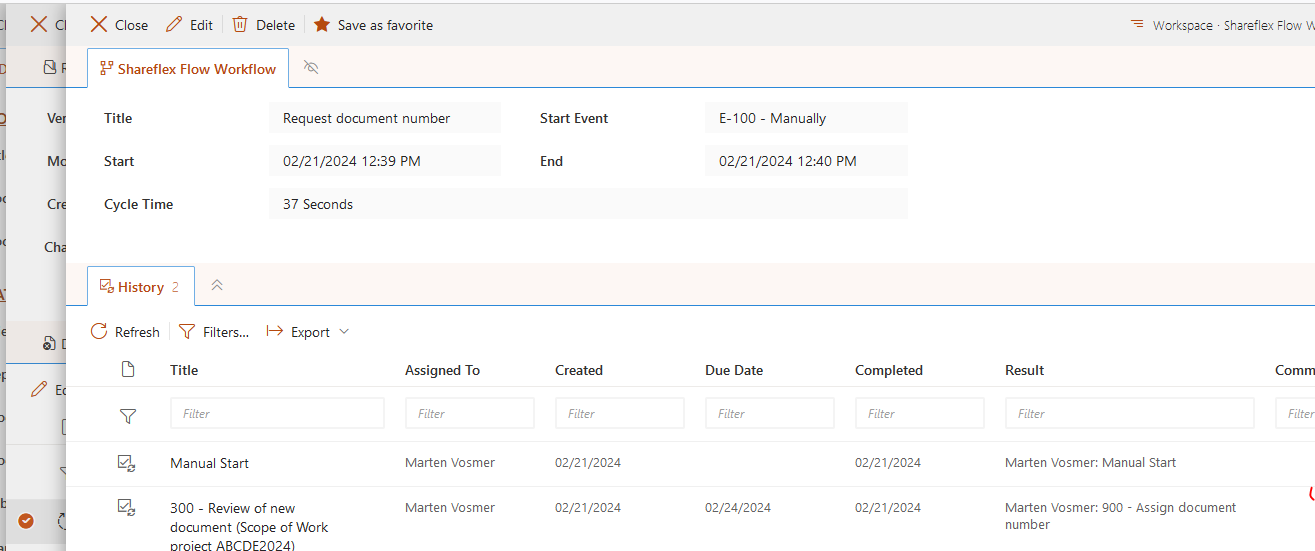
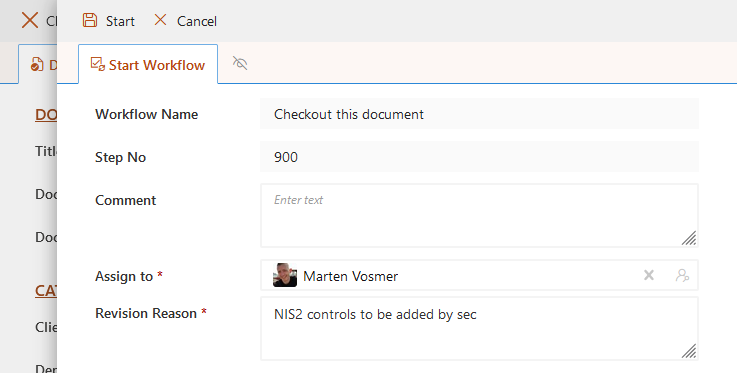
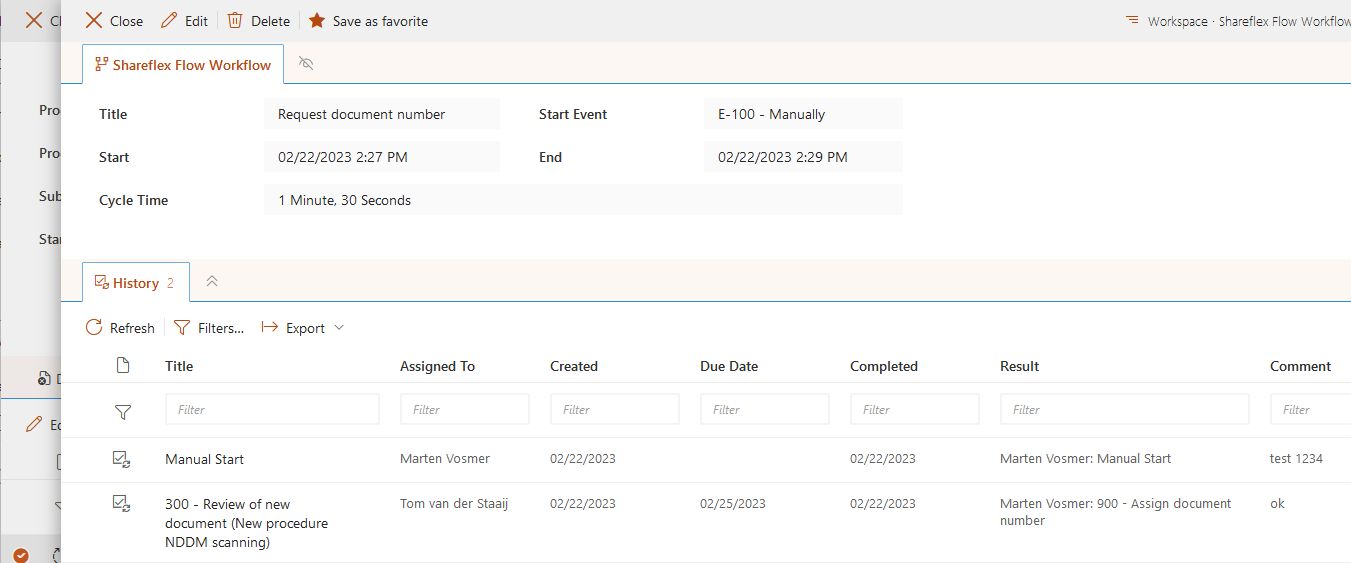
The first workflow that needs to be executed is to request a document number. This workflow is schematically depicted
below.
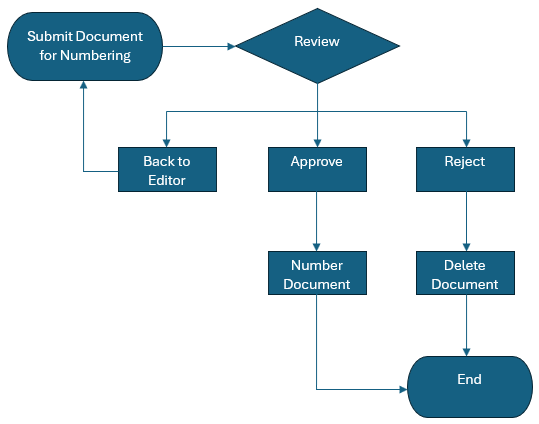
This workflow can be started using this button.

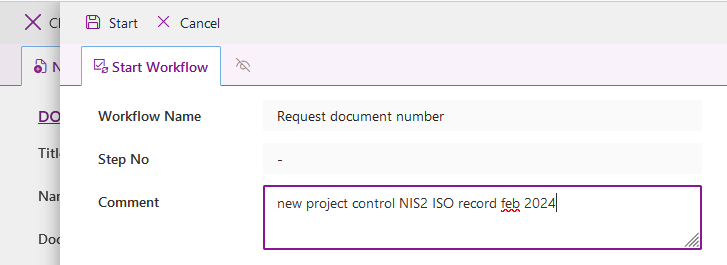
In the list of new documents, the status changes to 300 ….

The person entered in the reviewer field is now asked to give their approval. This workflow task can be found under the heading ‘My Outstanding Tasks’.
The complete workflow form is depicted below. We choose option 900 – Assign document number.
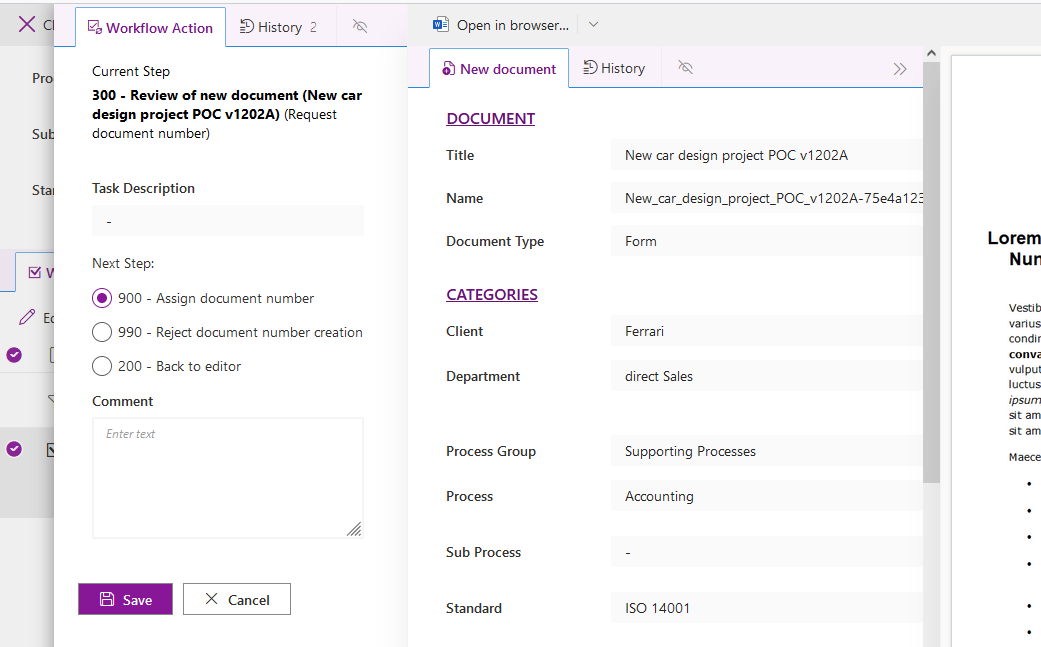
This workflow task then disappears from the list of outstanding tasks.
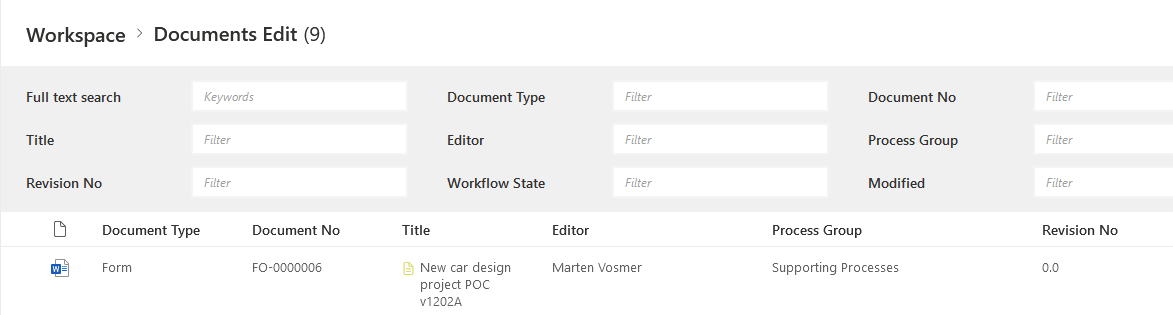
The new document is now included in the ‘Document Checked out’ list.
Publication Workflow

The publication workflow is covered in the ‘Edit Documents’ section.
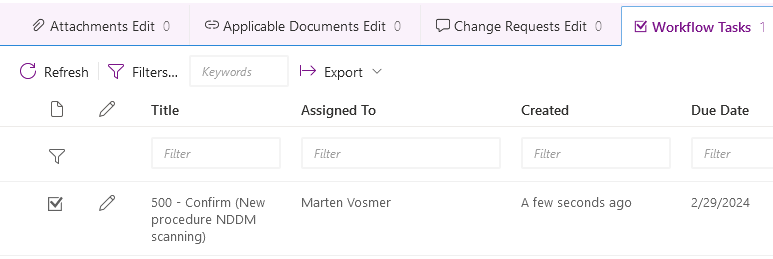
Parallel workflows
Shareflex QM allows users to add multiple approves like illustrated in the image below.
2 workflow tasks are created and these are assigned to the 2 differed approvers.
Both users have to approve the publication, only then the document is moved to valid documents.
After publication the workflow log displays that 2 people have done the publication approval. In this example Marten Vosmer carried out the approval job for Noel and Daan.
In the Shareflex workflow it can be set that one or all approvals are needed for the record to continue in the flow / e.g. be approved.
Before an approved document can be modified, it must be checked out.
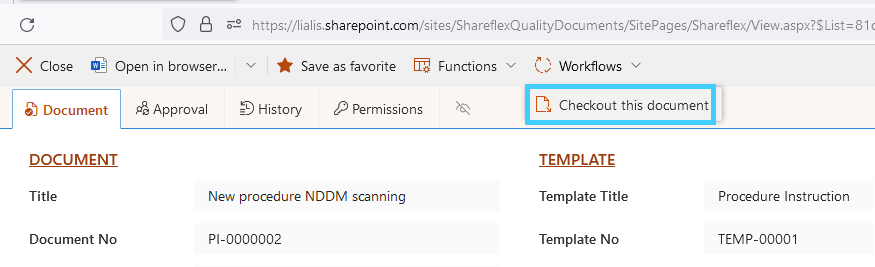
The document remains in the approved documents list, but the status is checked out, so the user is informed that a new version is in progress.
The change must be implemented in the list of documents in progress.
Open the relevant document and click ‘Edit’. In this example, metadata is modified, and a new version of the Word document is added.
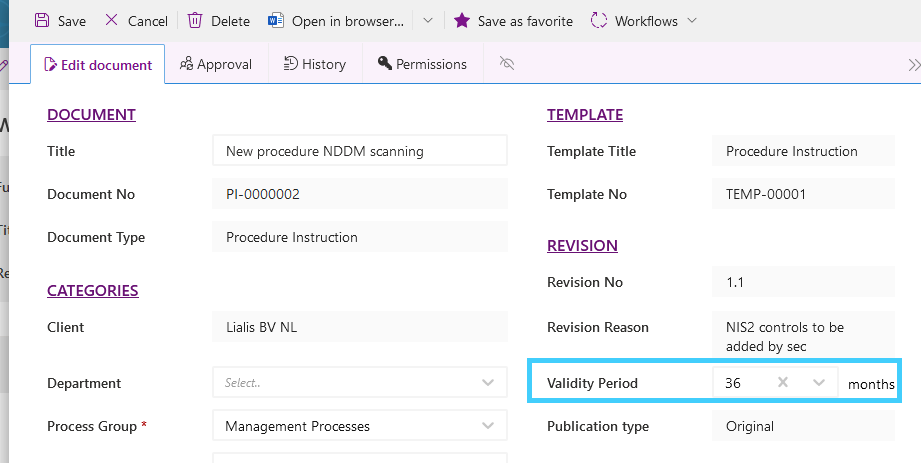
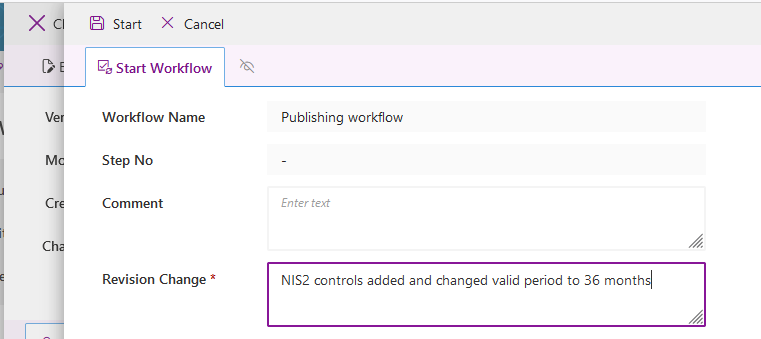
The validity period is changed to 36 months, and the record must be saved.
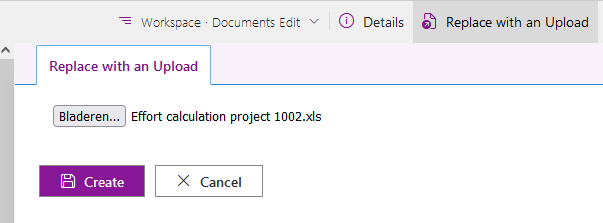
Now, the document can be replaced by an upload.
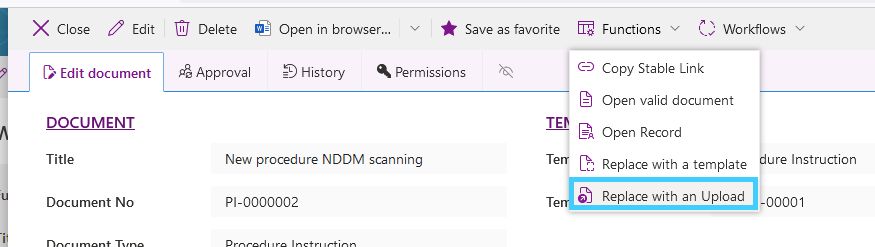
Choose the modified file and select ‘Create’.
The record window closes, and the documents in progress are displayed.
The changelog of the recently modified document only shows changes in the metadata fields. The adjustment of the validity period from 24 to 36 months is now displayed.
The version number of the record is in this case 4.0 because the checked out record has been adjusted 4 times in this change.
The version log shows the same intel as the change log, only with some more details.
The record has not been updated after this change because the publishing workflow must be started.
The record also indicates that the associated document is checked out.
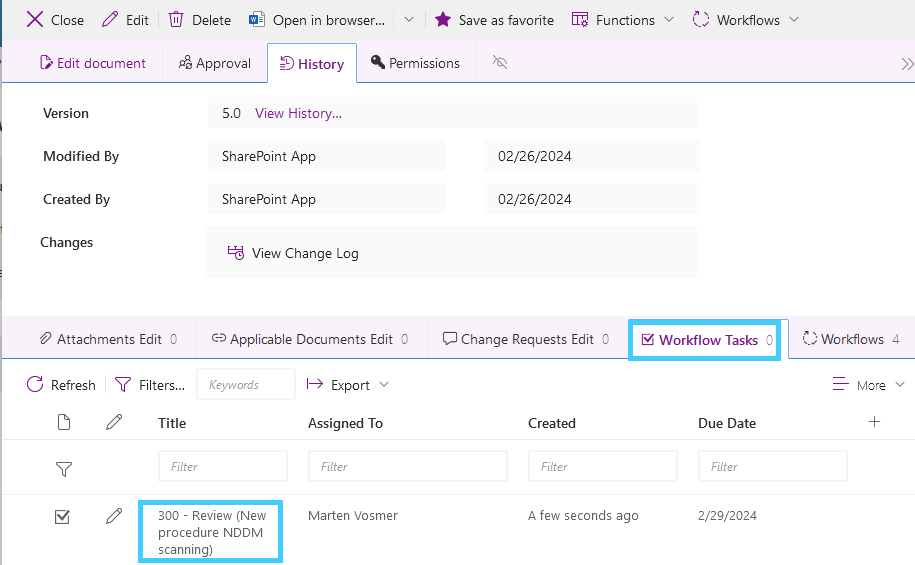
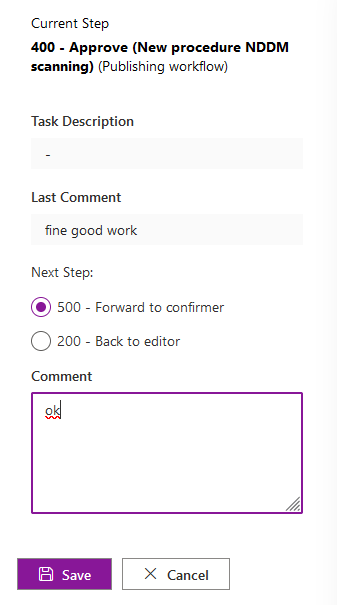
To make the changes active, the publishing workflow must be started.

The publication workflow is displayed in the schema below.
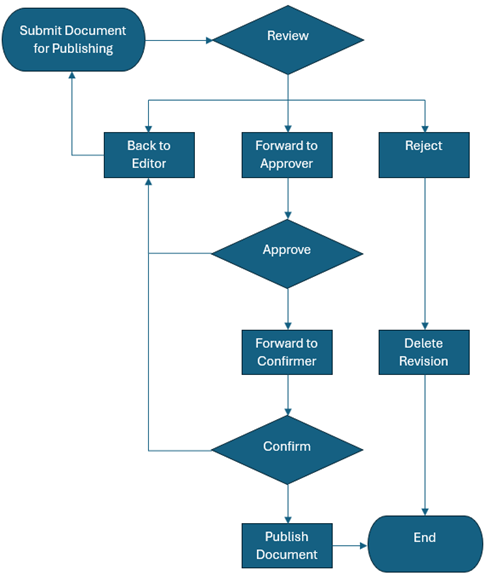
Workflow start form.
The workflow task is visible in the record, and the same task is also visible under the ‘My Tasks’ link on the home screen.
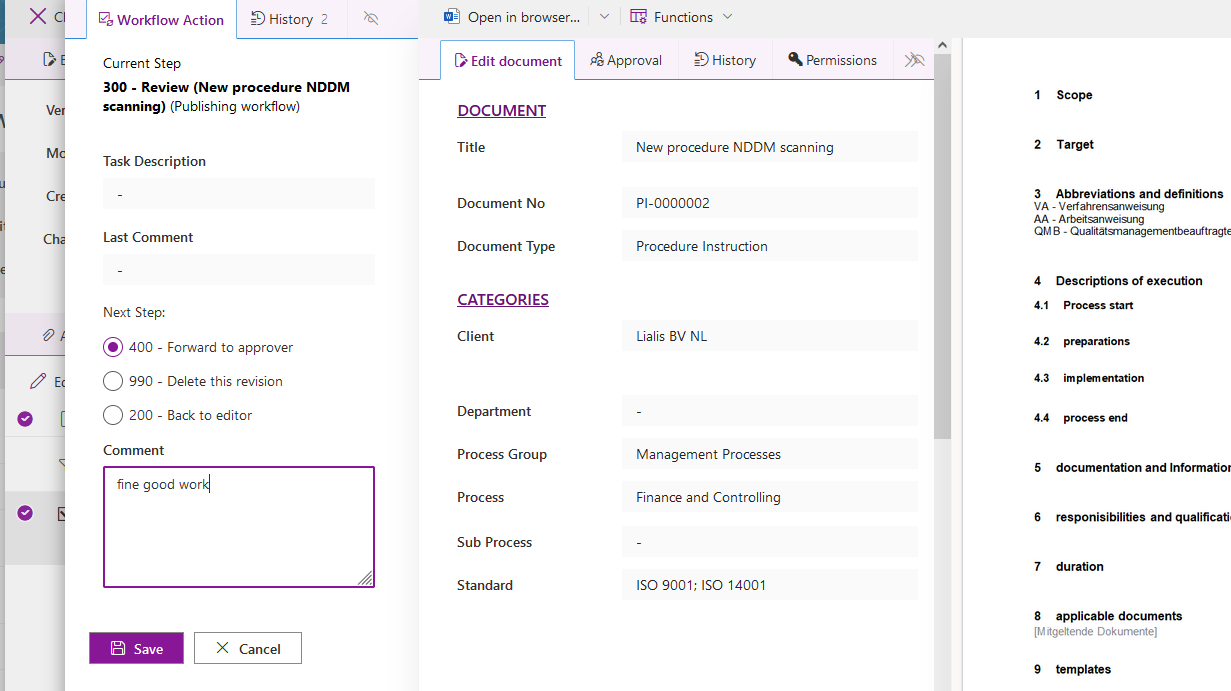
Forward to approver is chosen.
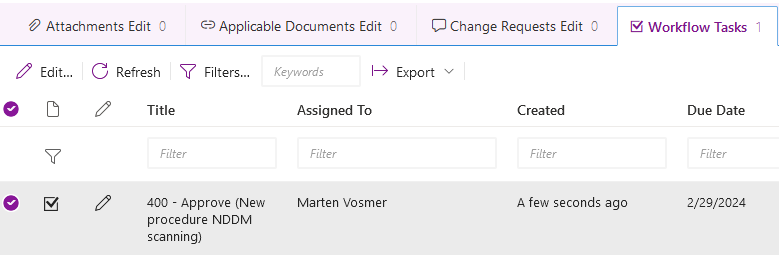
A new workflow task appears.
Forward to confirmer is chosen.
A new task appears, confirm.
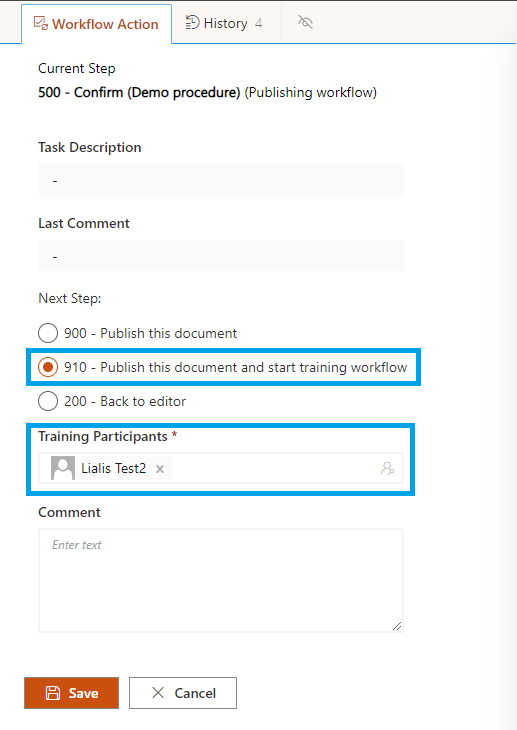
Publish this document is chosen.

Now, the publication workflow is complete. The recently modified document disappears from the list of documents in progress and appears in the list of approved documents.
The right part of the screen now shows the modified document.
The file shows the change in master data/metadata.
The “invalid documents” section of the record shows the previous version of the document, and the reason for revision is also displayed.

All workflows are shown in the file, providing detailed insight into the approval process.
This workflow makes it possible to notify certain end users that they need to read a certain approved document.
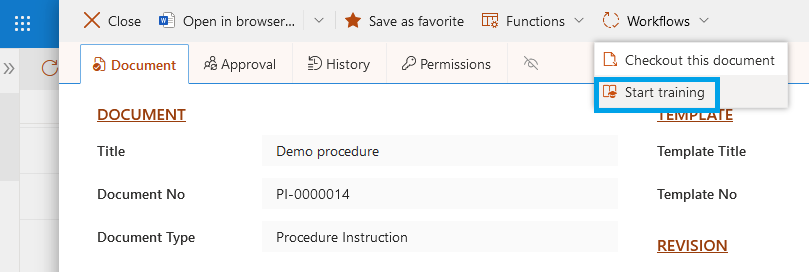
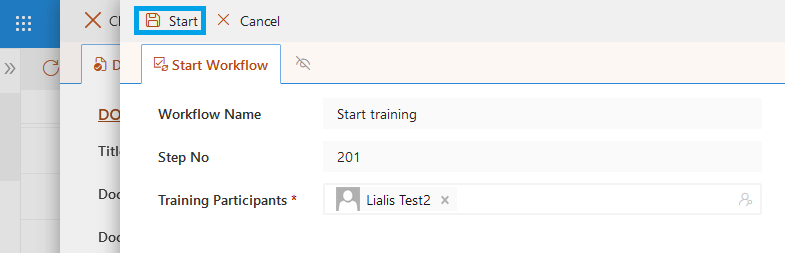
A reading task is then created for each chosen user.
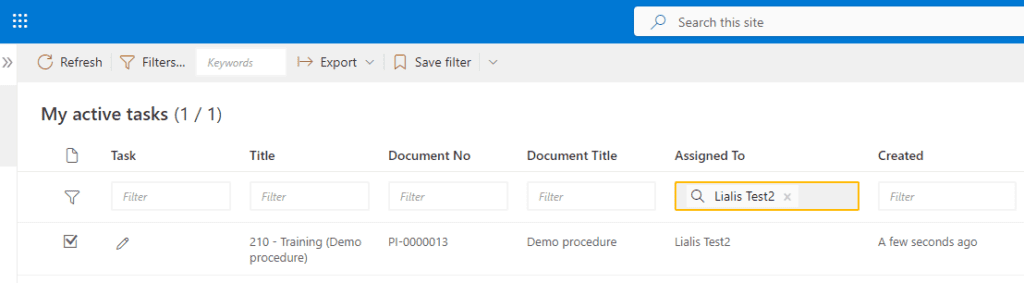
In this task the user will be able to confirm that he or she has read the document.
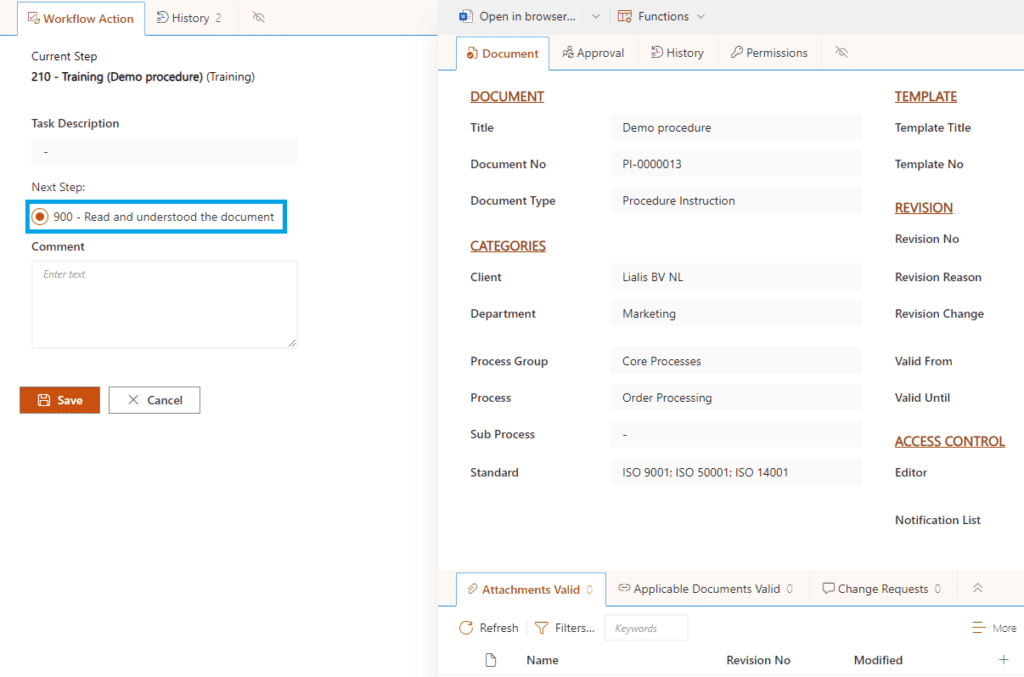
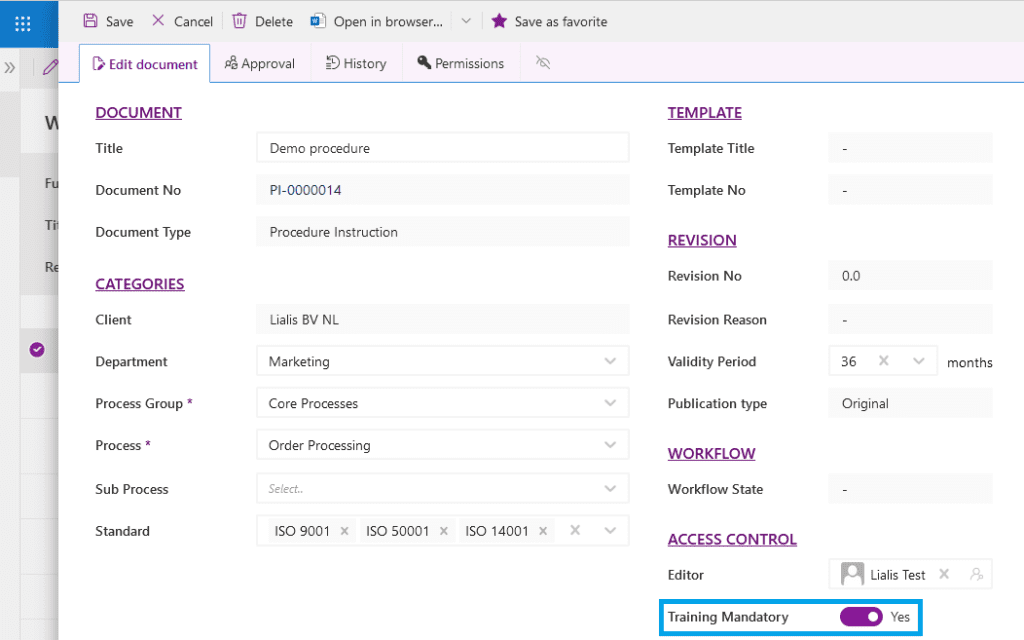
The notification workflow can also be started from within the task of the last step of the publishing workflow. This option will only appear when “Training Mandatory” is enabled for the document that is being edited.
It is not possible to start a publishing workflow when a notification workflow is already active, all reading tasks must be completed first. In addition to the reading tasks, the notification workflow also creates an administrative task, assigned to the configured Editor of the document.
This administrative task makes it possible to cancel active reading tasks.
In the Valid Documents list you can easily see if a notification workflow is active for a particular document, in which case the following icon will be present:
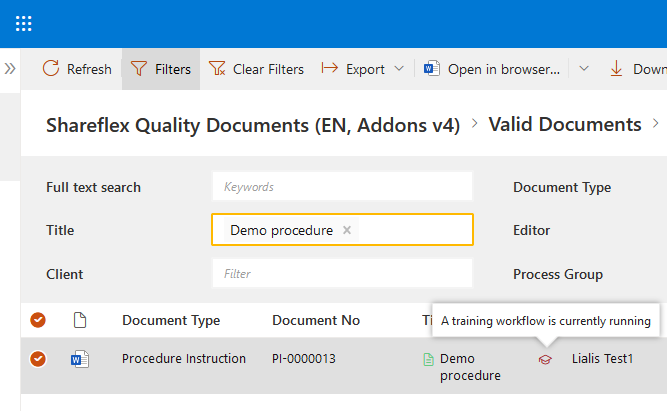
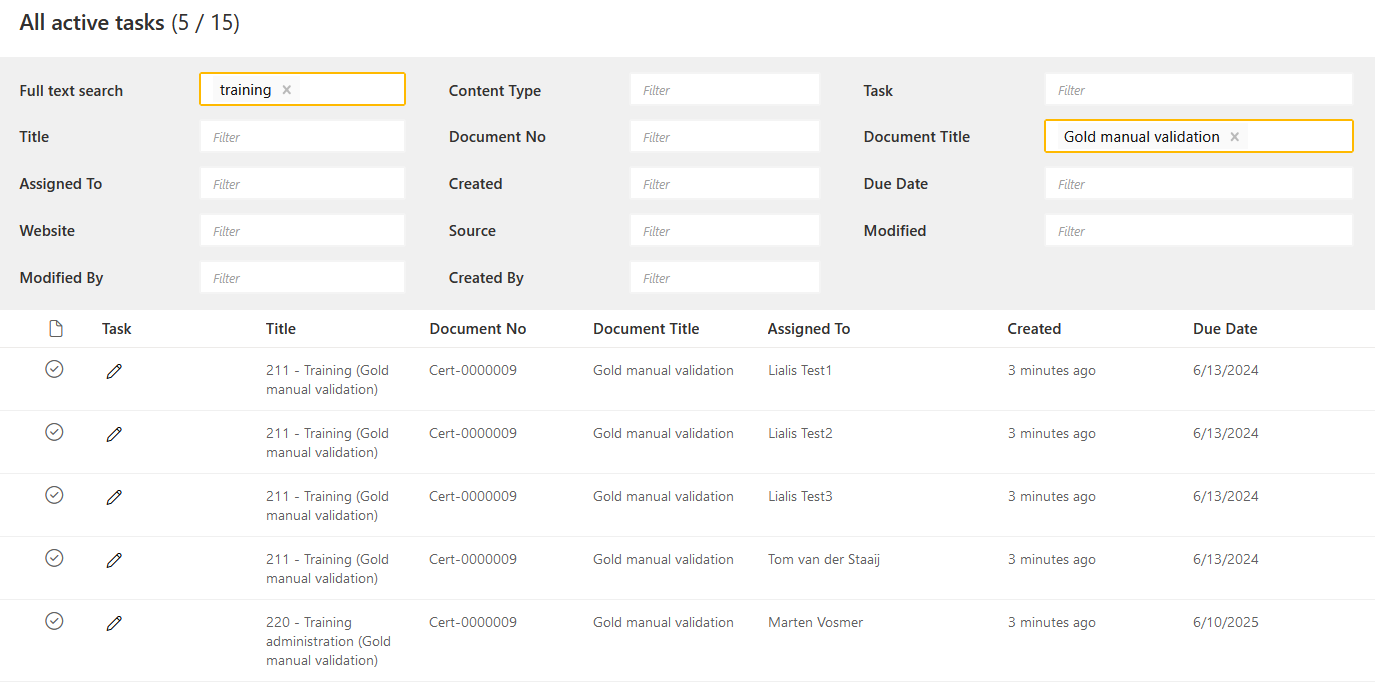
The owner can see in the All tasks part of QM if the progress of the training workflow, eg to see which people have not yet completed the document reading workflow.
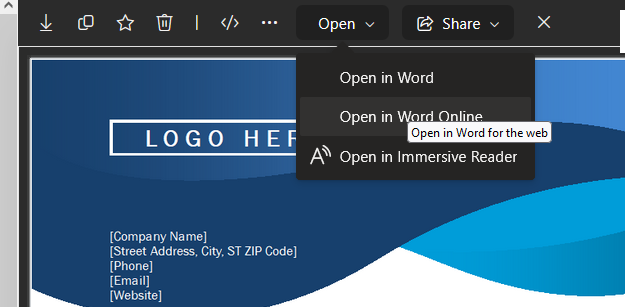
When done editing, simply close the browser window where the document is open, as it is saved continuously. The real-time saving of content changes also applies to the MS Word desktop application.
If enabled at the SharePoint Online site level, end users can share new and edit documents in QM with others inside the company to cooperate on the content, for example.
It’s not possible to share valid documents in QM because the content cannot be altered.
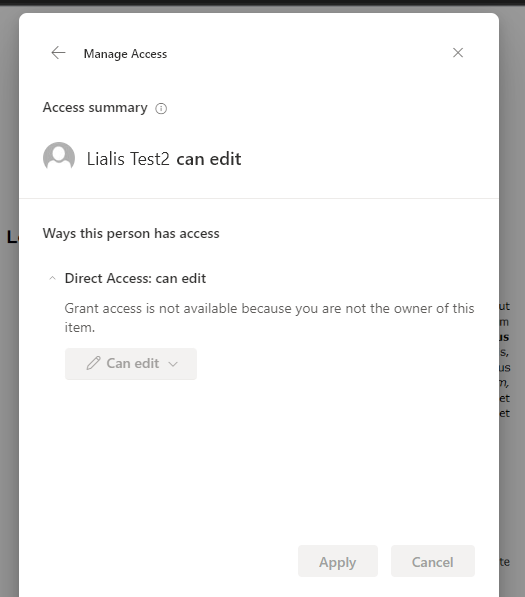
The document can be shared with anyone in the organization for co-editing with MS Office programs. The person does not need to have edit access to the Quality Documents solution.

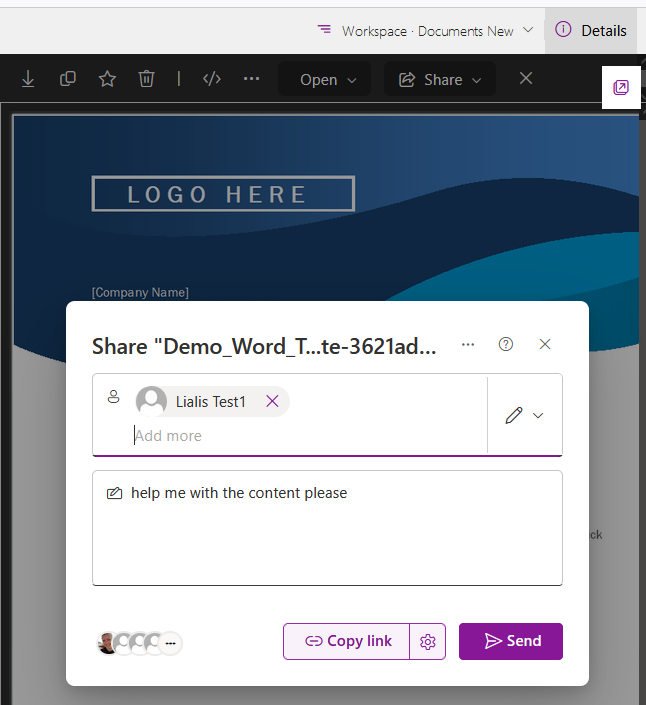
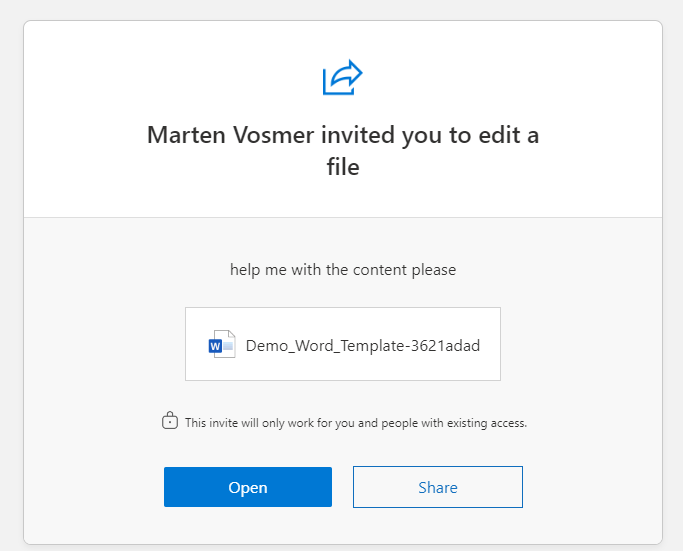
The user who has been invited will be notified by email that they are requested to work on the content of a specific document.
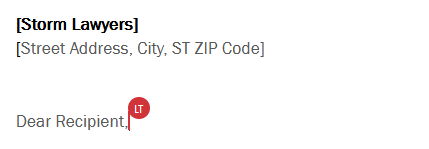
The co-editing feature in MS Office is very handy. Each user can see where others are working in the document, and changes made by each user are displayed in real-time.
The person with whom the document has been shared can also edit the document metadata (title and so forth).
When a document is shared with someone, this user will also see the record in the QM Edit or New Documents list. For example:

Once shared, the author of the document cannot retract the sharing; these options are greyed out.
When a document is submitted for Document Numbering workflows, for example, the sharing will be removed. If editing in the edit document phase is needed, the author has to share the document with colleagues again.
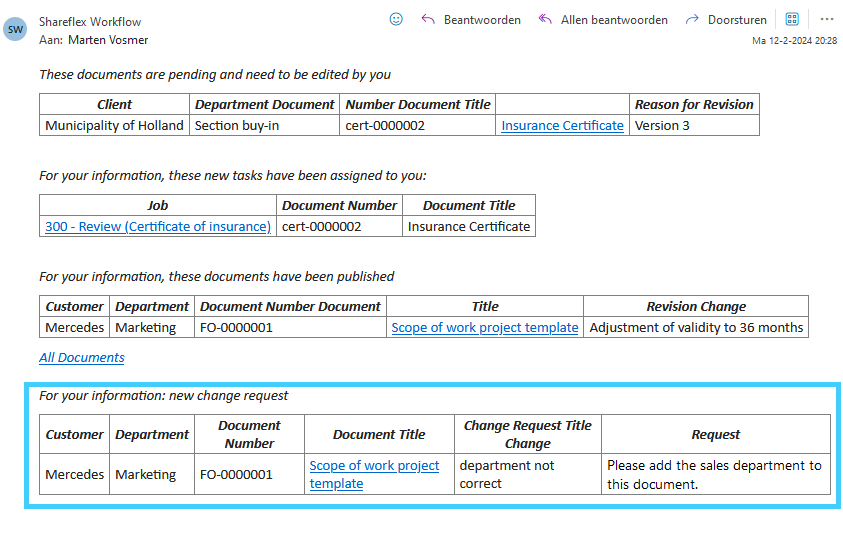
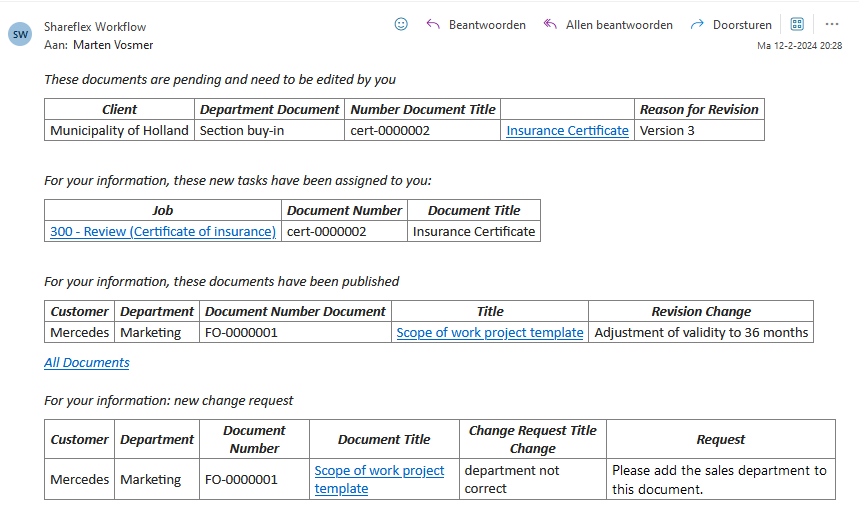
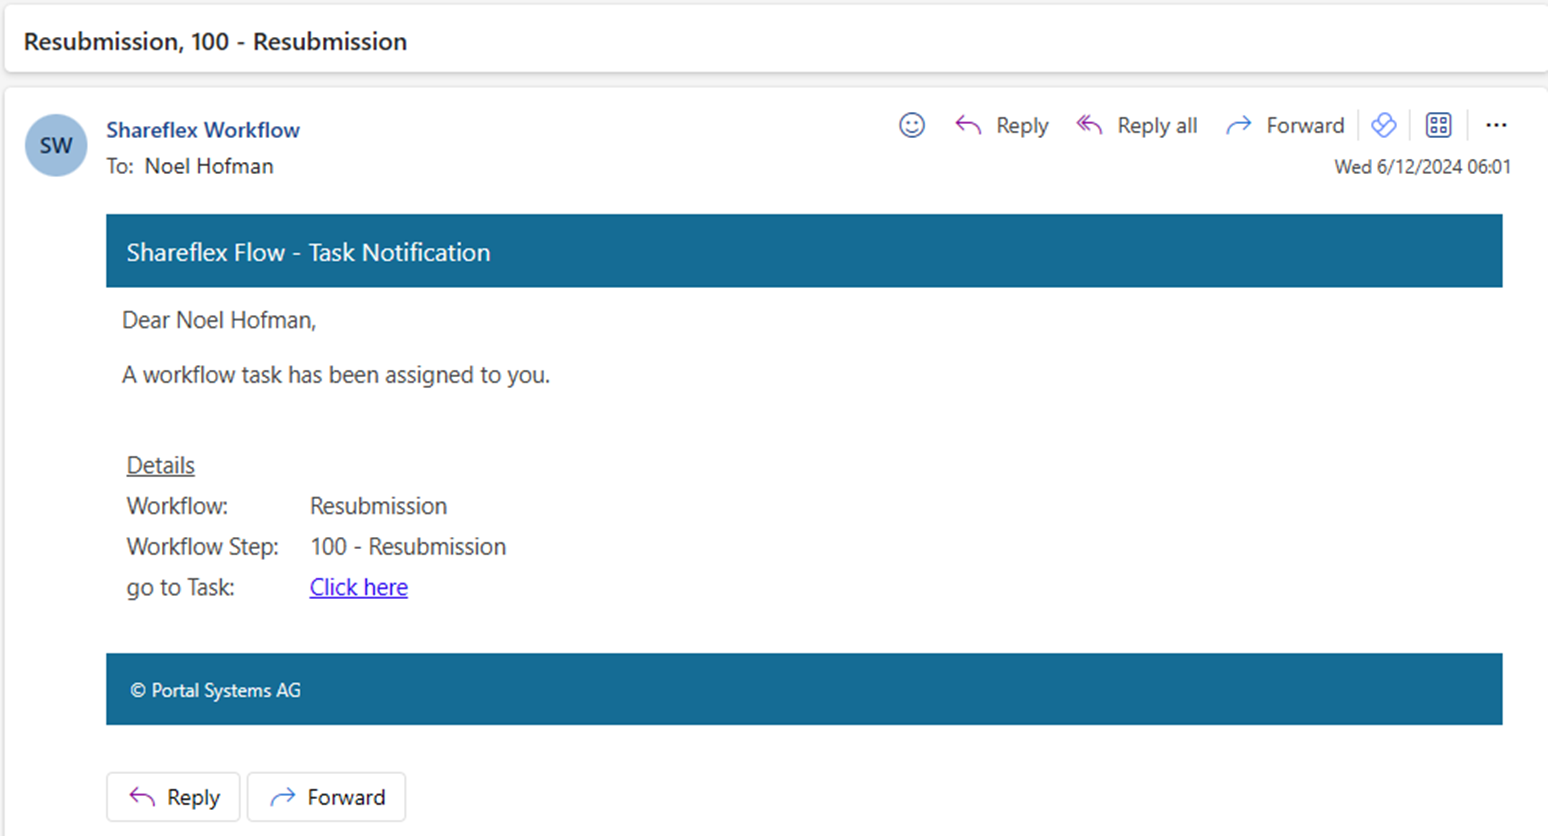
The software sends a daily update email with all relevant updates for the recipient. An example of the email is shown below.
If a document is about to expire due to the expiration period (or has already been expired), a resubmission flow is automatically started. 30 Days before the expiry of the validity, the CheckValidity timerJob finds documents whose validity is about to expire and, under certain conditions, starts the resubmission workflow. These conditions are:
• The ‘Valid Until’ date is within the next 30 days (configurable)
• The document is not already checked out
• There is currently no workflow running
The timer job runs every 24 hours. If the validity date of a document has been exceeded, nothing happens.
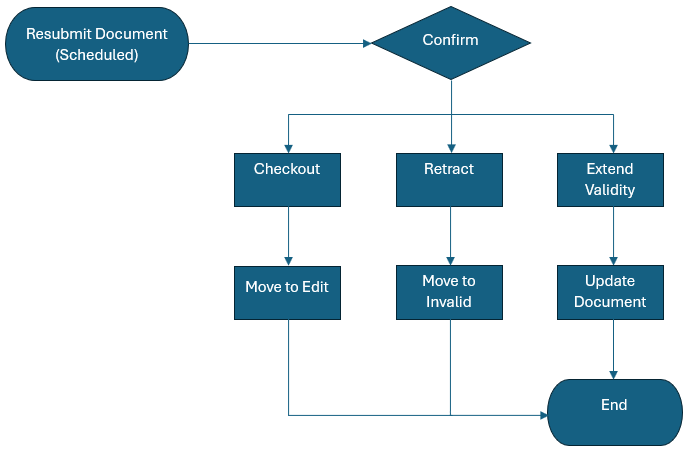
The following resubmission workflow is applicable.

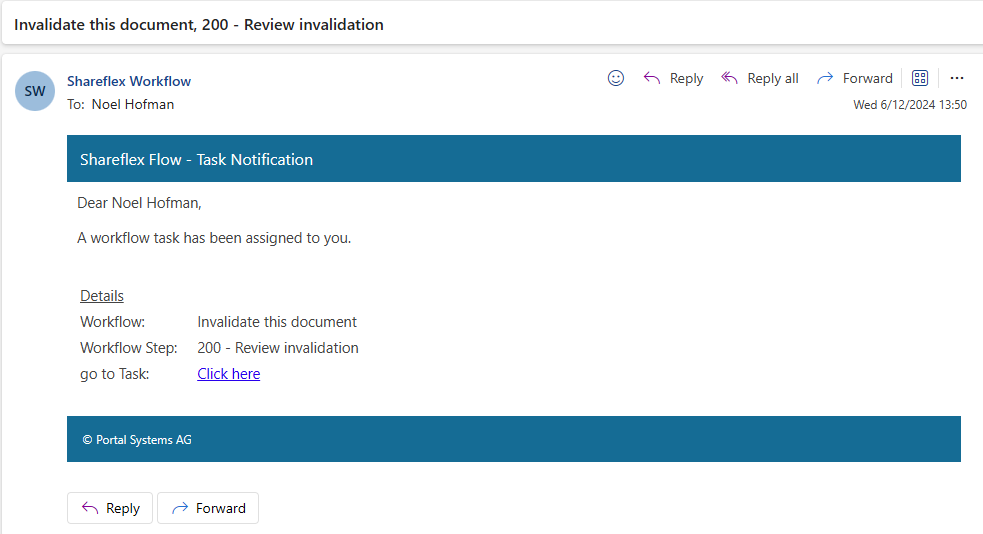
The editor of the document receives a mail that the document must be reviewed, with a link to the task. This email is sent once, triggered by the timer job at 6 AM.
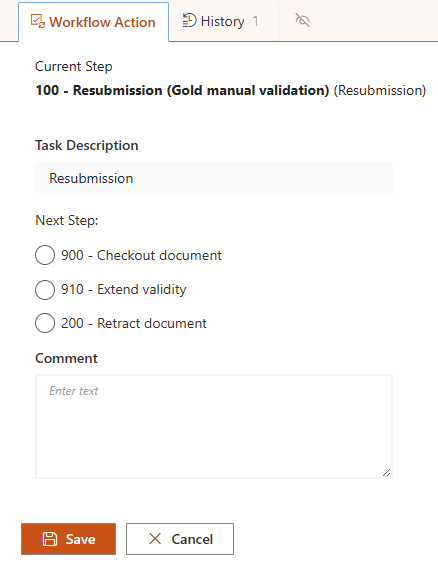
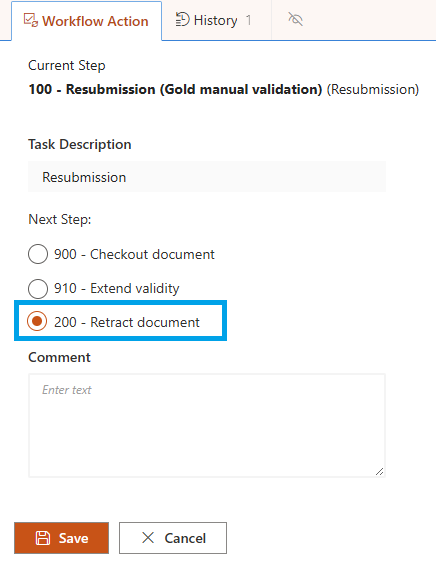
The Editor has the following options:
- check out the document (for editing and republishing)
- extend the document’s validity (maximum 3x by default).
- start the withdrawal workflow (retract)
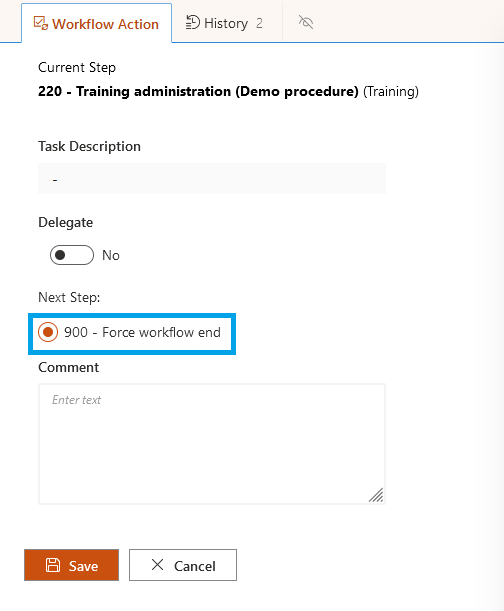
Extend Validity
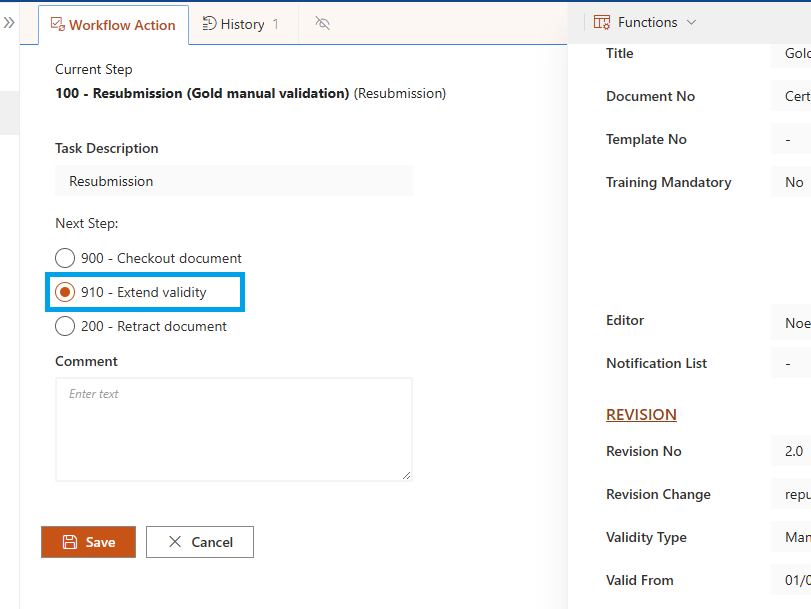
This will update the item with a new validity date that is calculated from the Validity Period value. In this example, the new validity date is today. This is because we chose the Manual validation type. Of course this is not a very meaningful validation date in practice, but to demonstrate the automatic resubmission, we had to choose this validation type to be able to enter a date within the next 30 days. Calculated validation goes from 12 months and longer.
When the item validity date is overdue, and there is no response on the workflow action, the status remains the same and the Workflow Action stays open.
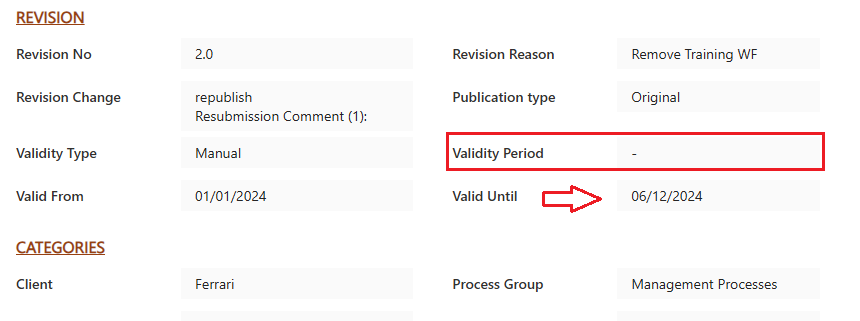
With a Calculated validity type, the new validity date will be calculated based on the validity period (in this case 12 months), which means that the first resubmission email will be sent on May 13 2025.

Checkout or Retract/Invalidate document
The follow workflow is applicable:
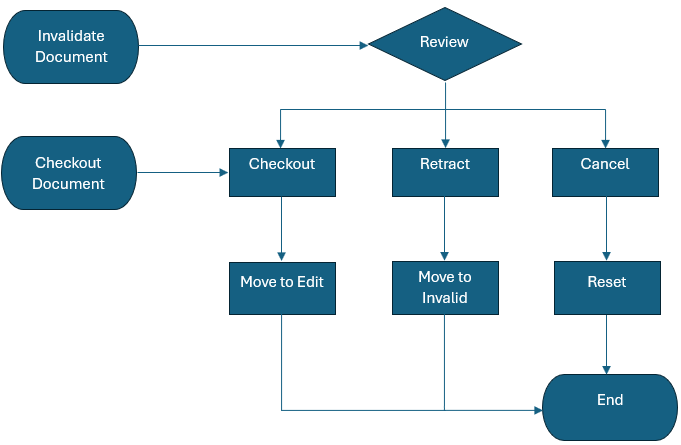
Checkout Document
Thus will move the document to the Checked Out documents library, where it can be edited and republished via the publishing workflow.
Retract document
The users that have confirmed the publishing of the latest version of the document receive an email.
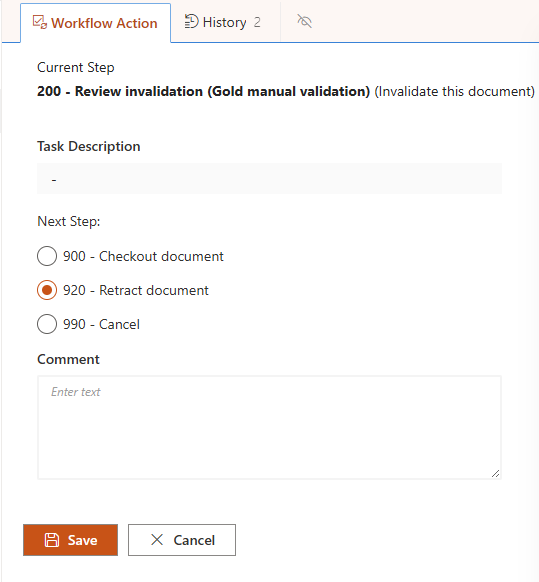
The confirmer has the following options:
- check out the document (for editing)
- withdraw the document (retract)
- cancel the withdrawal
When the document is retracted, it is removed from the Valid and Checked Out Documents libraries, and is only visible in the Records list, with Document Status “Invalid”, and marked with a red icon before the title.
All invalid versions of this document (including the last) are available in the Documents Invalid secundary library, displayed at the bottom of the item.
Shareflex applications consist of many different components, although they are all similar at a high level and have similar functions. These functions are explained in this section with a contract management application as an example.
Views
All views have the same functionality. The only difference between the different views is the columns and data they display.
Edit and New Buttons
Edit to edit 1 record, new dropdown to create new records, it is possible for the user to create multiple different types of new records/forms.
Quick Navigation to the Home Screen
By pressing >>, a menu is displayed to lead the user, for example, to the app’s home screen.
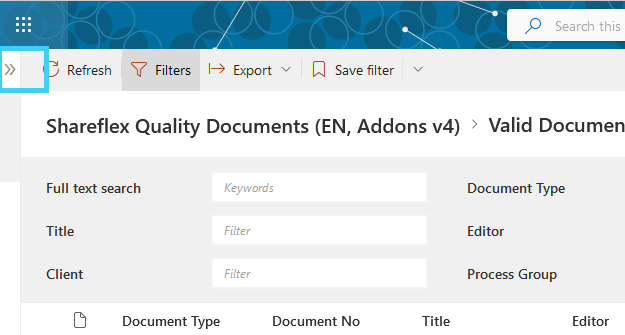
The result of pressing >> is shown in the images below.
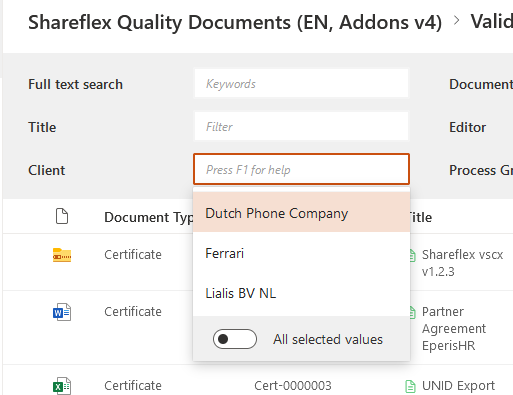
Filters
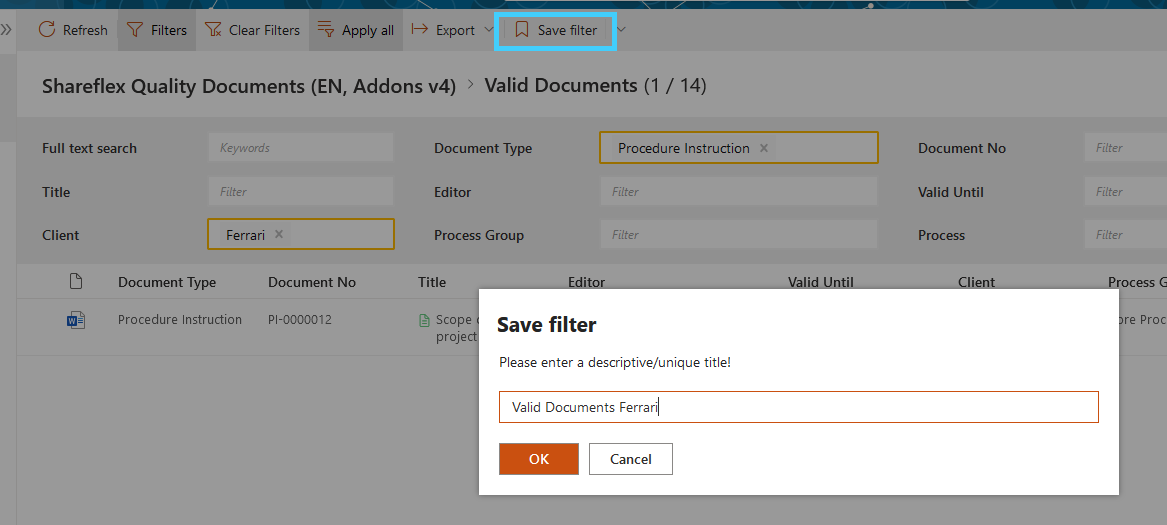
By pressing the Filters button, advanced filters can be displayed at the top of the view. Placing the cursor in a filter field will immediately display the values in this column that can be used for filtering.
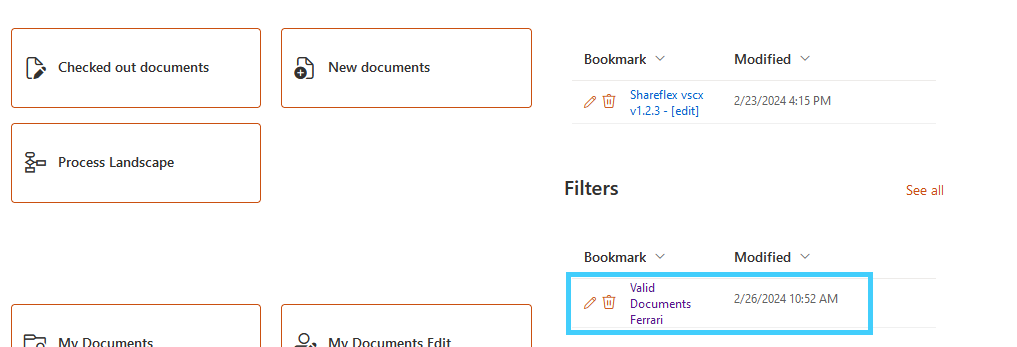
The end user can choose to save a personal filter, which will then be displayed on the app’s home screen.
The saved view is (only for the end user) displayed on the app’s home page. Clicking on this link will take the user to the view with the saved filters.
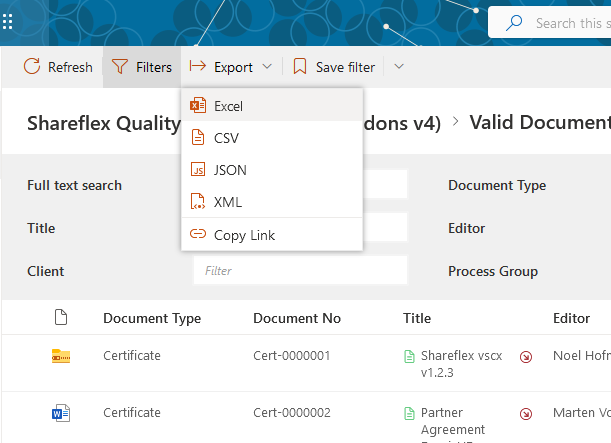
Export
Users can choose to export the content of the view by pressing the export button.
Document Preview in Contract Management Software SharePoint
By pressing the details button, a window is displayed in the right half of the view, where users can quickly view the file selected in the left part of the window in the view.
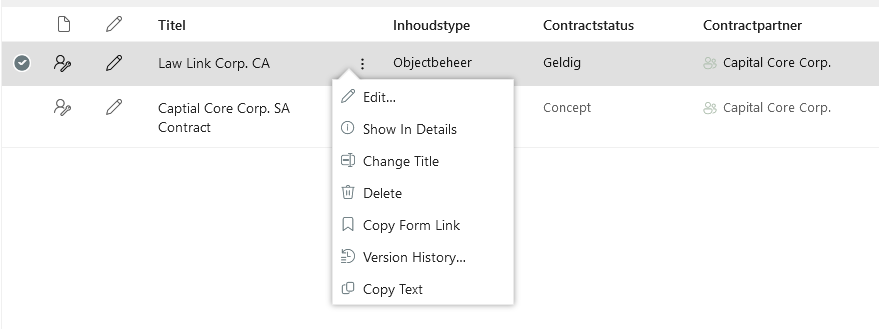
Right-Click Menu
Anywhere in the view, the user can show a menu displayed by right-clicking on the record.
Data Tabs
All data on a record form is displayed on convenient tabs at the top of the form.
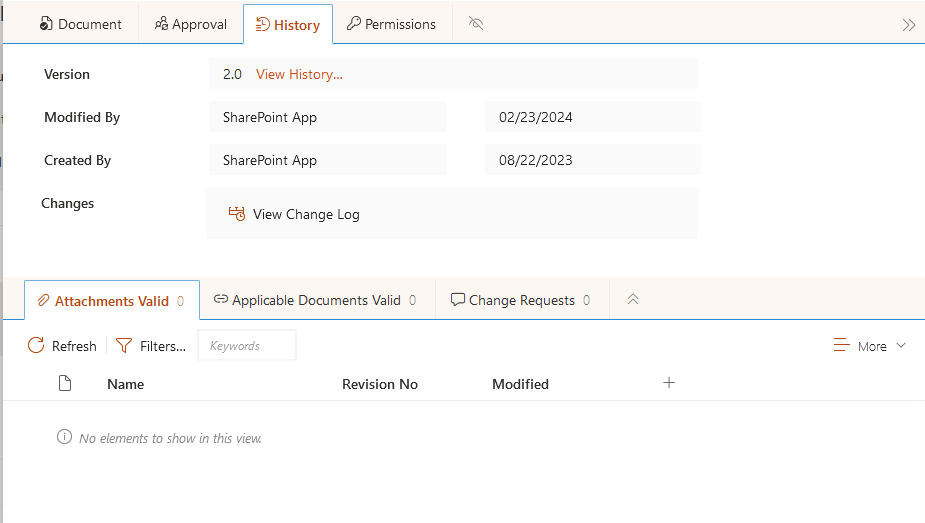
Version history and revision changelog
The History tab shows the SharePoint version history, in which users can view and restore older item versions. It is also possible to export the entire version history, e.g. to Excel.

Because a document can be present in multiple locations at the same time (e.g. when someone is working on a new revision, which creates a copy), Shareflex Quality Documents also includes a separate revision change log in addition to the version history. This change log shows the differences between all document revisions.
The video below shows several functions available within the History tab.
The following roles are present in the QM application.

The QM application roles and privileges are explained in the table below.
| Group |
Purpose | Read Permissions | Edit Permissions | Delete Permissions |
| QM Administrator | Create/execute, edit and delete permissions in the Admin environment of the application (workflows, permissions, notifications, admin jobs) Cancel active workflows NO access to Shareflex Core (pscBAF) |
Yes | Yes | Yes |
| QM Approver | No permissions in itself, only when used as value in the Approver field.
The Approver field can hold QM Approver and/or other usernames/groups. Users in the Approver field can view all items in Edit and Valid Documents, and approve ‘Submitted for approval’ items in the Documents Edit library, for which they receive workflow task links via email. |
Edit and Valid Documents (when role is used in Approver field) | No | No |
| QM Clearing | No permissions in itself, only when used as value in the Clearing field in a Workflow definition.
The user(s)/group in the Clearing field is allowed to cancel active workflows, when the Clearing role is activated in the Workflow binding document. Administrators can always cancel active workflows. If the Clearing field is changed, the new clearing authority only applies to new workflows. Existing active workflows can only be canceled by the old clearing authority (or an administrator). |
Not relevant | Not relevant | Not relevant |
| QM Contributor | Only create or upload a new document. Editing and starting workflow capabilities is attributed to the Editor field to which the item creator is added initially. | No | No | No |
| QM Reader | Read permissions to all documents in New, Edit and Valid Documents | Yes | No | No |
| QM Reviewer | No permissions in itself, only when used as value in the Reviewer field.
The Reviewer field can hold QM Reviewer and/or other usernames/groups. Users in the Reviewer field can view all items in Documents New, Edit and Valid, and approve ‘Submitted for review’ items in the Documents New and Edit libraries, for which they receive workflow task links via email. |
New, Edit and Valid Documents (when role is used in Reviewer field) | No | No |
| Shareflex Authenticated Users | Read permissions to all documents in Valid Documents | Valid Documents | No | No |
| Shareflex Solution Administrator | Unlimited access, including access to Shareflex Core (pscBAF) | Yes | Yes | Yes |
Adding or removing users from these QM groups has an immediate effect on the end user’s permissions.